
主题
Elysia 教程
¥Elysia Tutorial
我们将构建一个小型的 CRUD 注意 API 服务器。
¥We will be building a small CRUD note-taking API server.
没有数据库或其他 "生产就绪" 功能。本教程将仅关注 Elysia 功能以及如何使用 Elysia。
¥There's no database or other "production ready" features. This tutorial is going to only focus on Elysia feature and how to use Elysia only.
如果你继续操作,预计大约需要 15-20 分钟。
¥We expect it to take around 15-20 minutes if you follow along.
来自其他框架?
¥From other framework?
如果你使用过其他流行的框架,例如 Express、Fastify 或 Hono,你会发现 Elysia 非常容易上手,只有一些区别。
¥If you have used other popular frameworks like Express, Fastify, or Hono, you will find Elysia right at home with just a few differences.
不喜欢本教程?
¥Not a fan of tutorial?
如果你更喜欢自己动手尝试,可以跳过本教程,直接转到 关键概念 页面,以更好地了解 Elysia 的工作原理。
¥If you prefer a more try-it-yourself approach, you can skip this tutorial and go straight to the key concept page to get a good understanding of how Elysia works.
llms.txt
或者,你可以下载 llms.txt 或 llms-full.txt,并将其提供给你喜欢的 LLM,例如 ChatGPT、Claude 或 Gemini,以获得更具交互性的体验。
¥Alternatively, you can download llms.txt or llms-full.txt and feed it to your favorite LLMs like ChatGPT, Claude or Gemini to get a more interactive experience.
设置
¥Setup
Elysia 设计运行于 Bun(Node.js 的替代运行时),但它也可以运行于 Node.js 或任何支持 Web 标准 API 的运行时。
¥Elysia is designed to run on Bun, an alternative runtime to Node.js but it can also run on Node.js or any runtime that support Web Standard API.
但是,在本教程中,我们将使用 Bun。
¥However, in this tutorial we will be using Bun.
如果尚未安装 Bun,请安装。
¥Install Bun if you haven't already.
bash
curl -fsSL https://bun.sh/install | bashbash
powershell -c "irm bun.sh/install.ps1 | iex"创建新项目
¥Create a new project
bash
# Create a new project
bun create elysia hi-elysia

# cd into the project
cd hi-elysia

# Install dependencies
bun install
这将创建一个包含 Elysia 和基本 TypeScript 配置的准系统项目。
¥This will create a barebone project with Elysia and basic TypeScript config.
启动开发服务器
¥Start the development server
bash
bun dev打开浏览器并访问 http://localhost:3000,你应该会在屏幕上看到“Hello Elysia”消息。
¥Open your browser and go to http://localhost:3000, you should see Hello Elysia message on the screen.
Elysia 使用带有 --watch 标志的 Bun,以便在进行更改时自动重新加载服务器。
¥Elysia use Bun with --watch flag to automatically reload the server when you make changes.
路由
¥Route
要添加新路由,我们需要指定一个 HTTP 方法、一个路径名和一个值。
¥To add a new route, we specify an HTTP method, a pathname, and a value.
让我们首先按如下方式打开 src/index.ts 文件:
¥Let's start by opening the src/index.ts file as follows:
typescript
import { Elysia } from 'elysia'

const app = new Elysia()
    .get('/', () => 'Hello Elysia')
    .get('/hello', 'Do you miss me?')
    .listen(3000)
打开 http://localhost:3000/hello,你应该会看到“Do you miss me?”。
¥Open http://localhost:3000/hello, you should see Do you miss me?.
我们可以使用多种 HTTP 方法,但在本教程中我们将使用以下方法:
¥There are several HTTP methods we can use, but we will use the following for this tutorial:
get
post
put
patch
delete
还有其他方法可用,请使用与 get 相同的语法
¥Other methods are available, use the same syntax as get
typescript
import { Elysia } from 'elysia'

const app = new Elysia()
    .get('/', () => 'Hello Elysia')
    .get('/hello', 'Do you miss me?')
    .post('/hello', 'Do you miss me?')
    .listen(3000)
Elysia 接受值和函数作为响应。
¥Elysia accepts both value and function as a response.
但是,我们可以使用函数访问 Context(路由和实例信息)。
¥However, we can use function to access Context (route and instance information).
typescript
import { Elysia } from 'elysia'

const app = new Elysia()
    .get('/', () => 'Hello Elysia')
    .get('/', ({ path }) => path)
    .post('/hello', 'Do you miss me?')
    .listen(3000)
OpenAPI
在浏览器中输入 URL 只能与 GET 方法交互。要与其他方法交互,我们需要一个 REST 客户端,例如 Postman 或 Insomnia。
¥Entering a URL to the browser can only interact with the GET method. To interact with other methods, we need a REST Client like Postman or Insomnia.
幸运的是,Elysia 自带了一个带有 Scalar 的 OpenAPI Schema,可以与我们的 API 交互。
¥Luckily, Elysia comes with a OpenAPI Schema with Scalar to interact with our API.
bash
# Install the OpenAPI plugin
bun add @elysiajs/openapi
然后将插件应用到 Elysia 实例。
¥Then apply the plugin to the Elysia instance.
typescript
import { Elysia } from 'elysia'
import { openapi } from '@elysiajs/openapi'

const app = new Elysia()
    // Apply the openapi plugin
    .use(openapi())
    .get('/', ({ path }) => path)
    .post('/hello', 'Do you miss me?')
    .listen(3000)
导航到 http://localhost:3000/openapi,你应该会看到如下文档:
¥Navigate to http://localhost:3000/openapi, you should see the documentation like this:
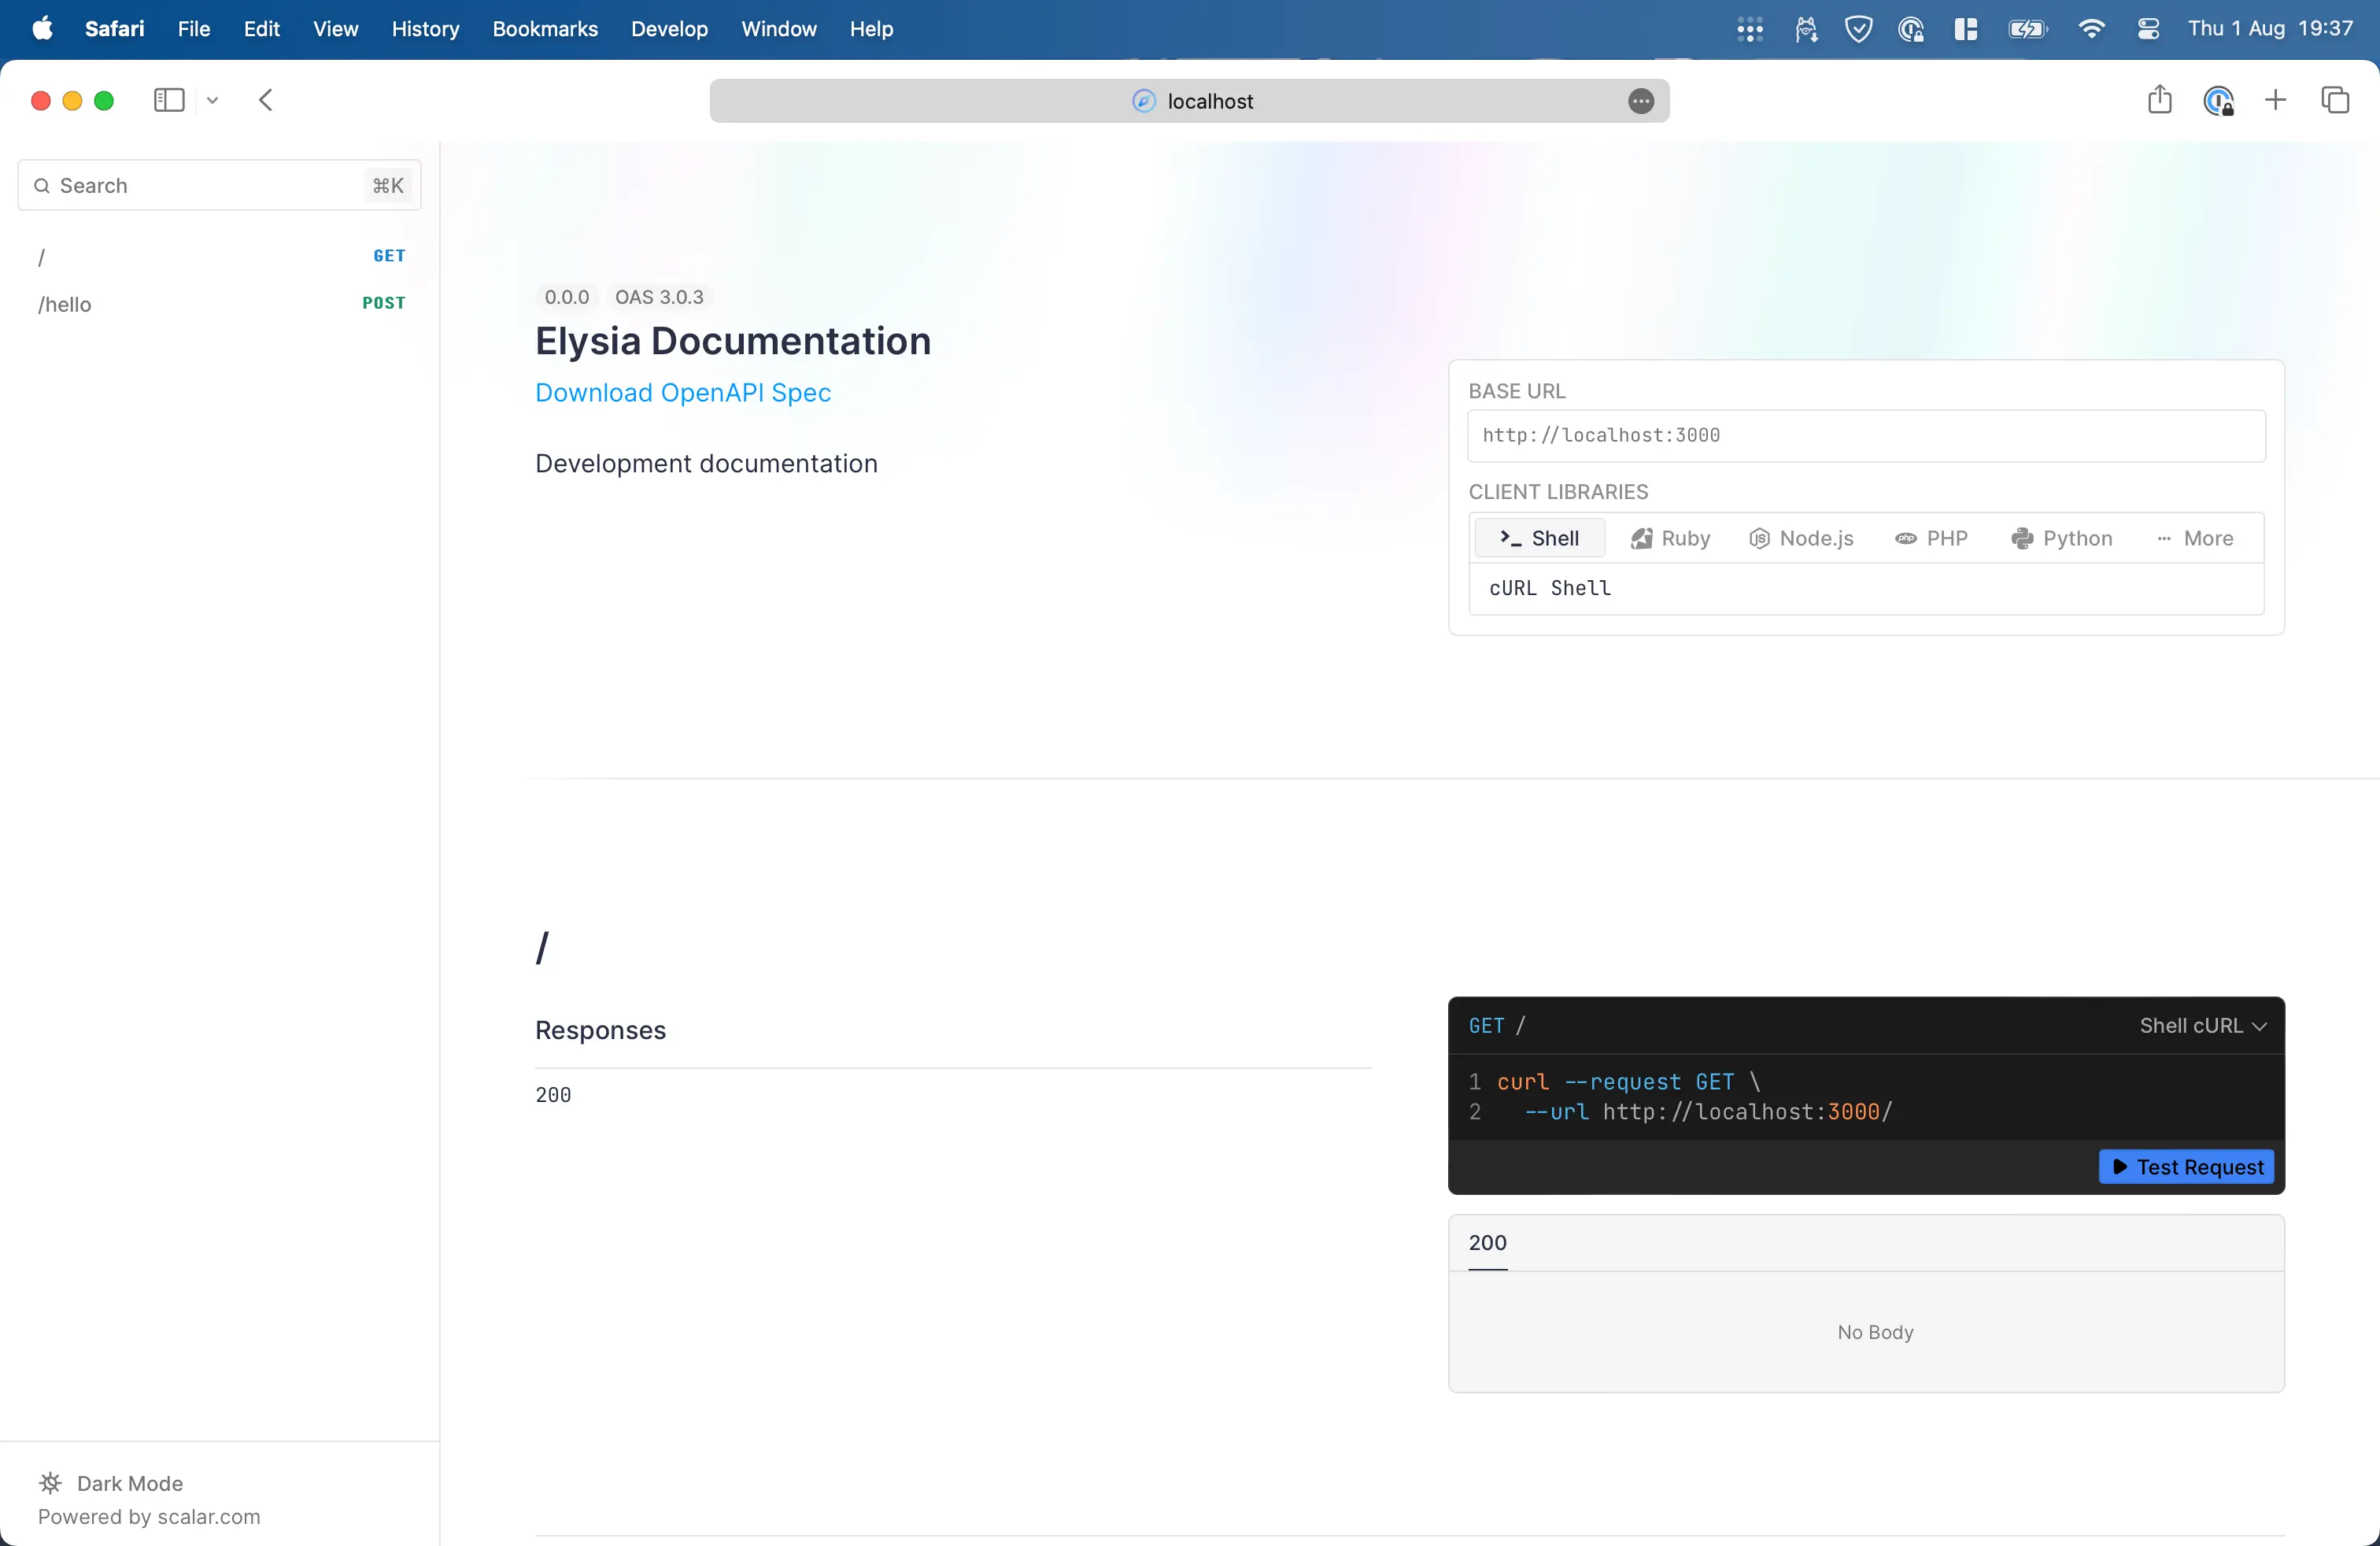
现在,我们可以与我们创建的所有路由进行交互。
¥Now we can interact with all the routes we have created.
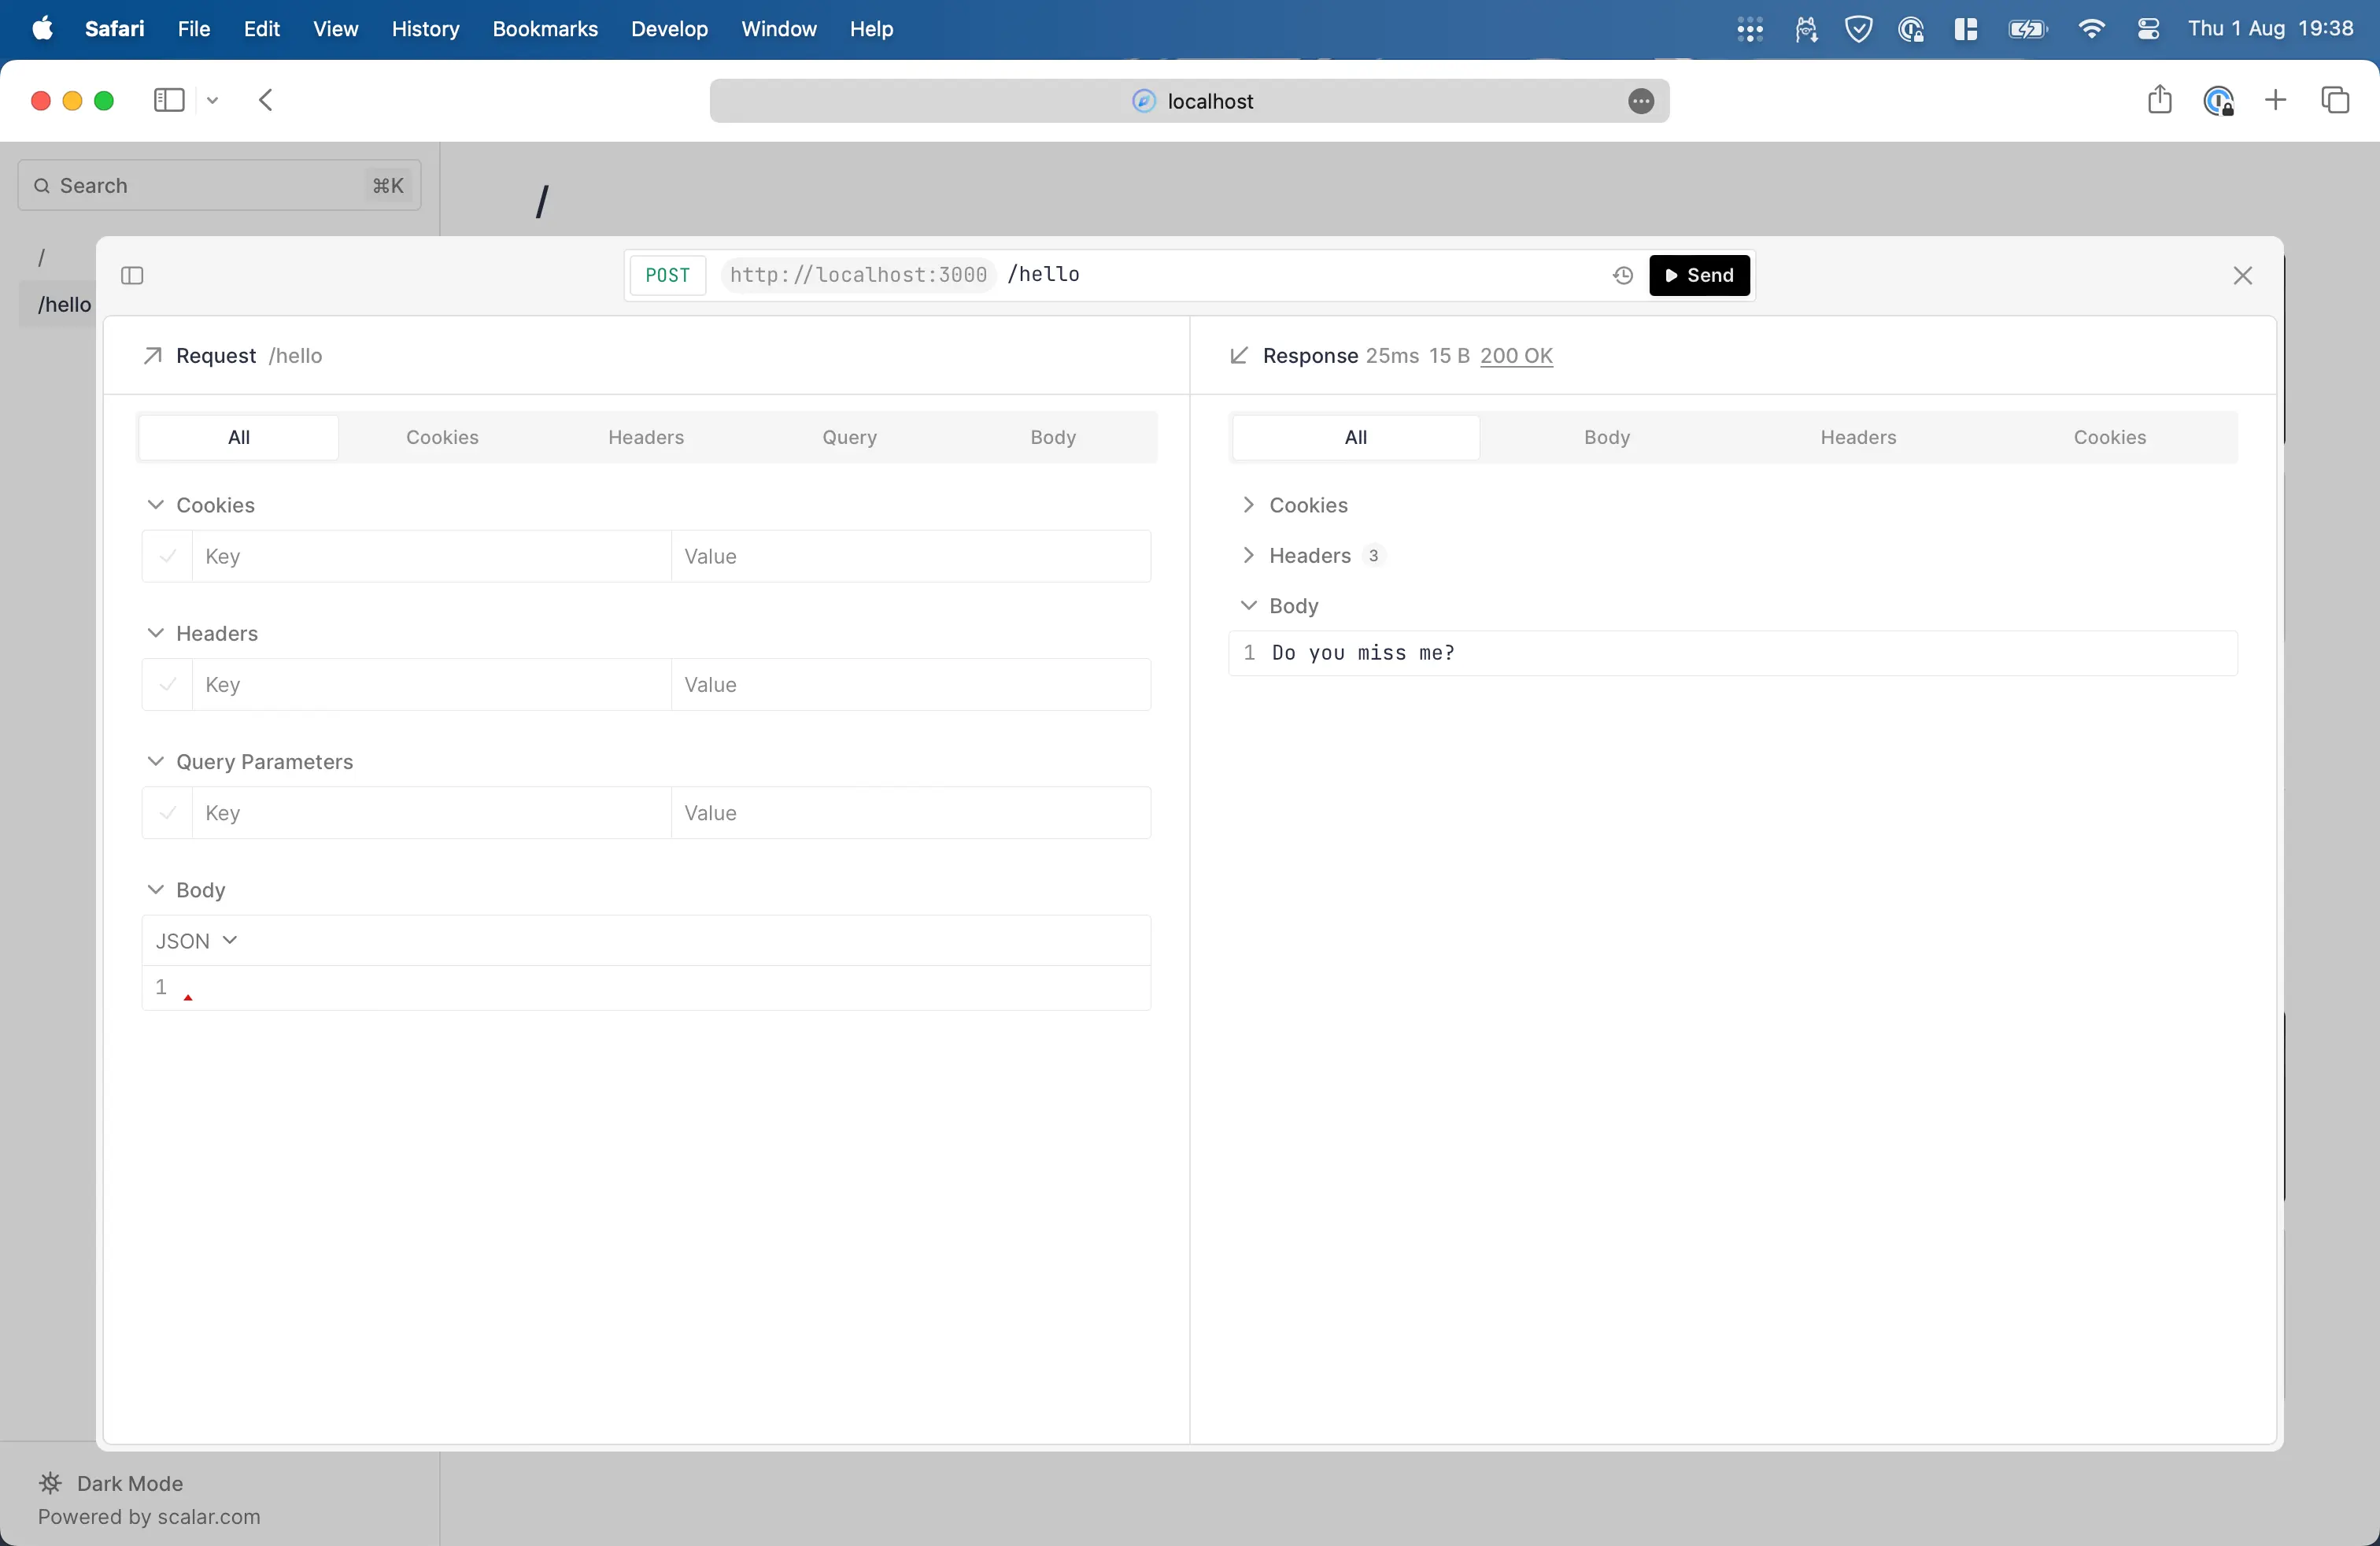
滚动到 /hello 并点击蓝色的测试请求按钮以显示表单。
¥Scroll to /hello and click a blue Test Request button to show the form.
点击黑色的“发送”按钮即可查看结果。
¥We can see the result by clicking the black Send button.
装饰
¥Decorate
但是,对于更复杂的数据,我们可能希望使用类来处理复杂数据,因为它允许我们定义自定义方法和属性。
¥However, for more complex data we may want to use class for complex data as it allows us to define custom methods and properties.
现在,让我们创建一个单例类来存储我们的注意。
¥Now, let's create a singleton class to store our notes.
typescript
import { Elysia } from 'elysia'
import { openapi } from '@elysiajs/openapi'
class Note {
constructor(public data: string[] = ['Moonhalo']) {}
}
const app = new Elysia()
.use(openapi())
.decorate('note', new Note())
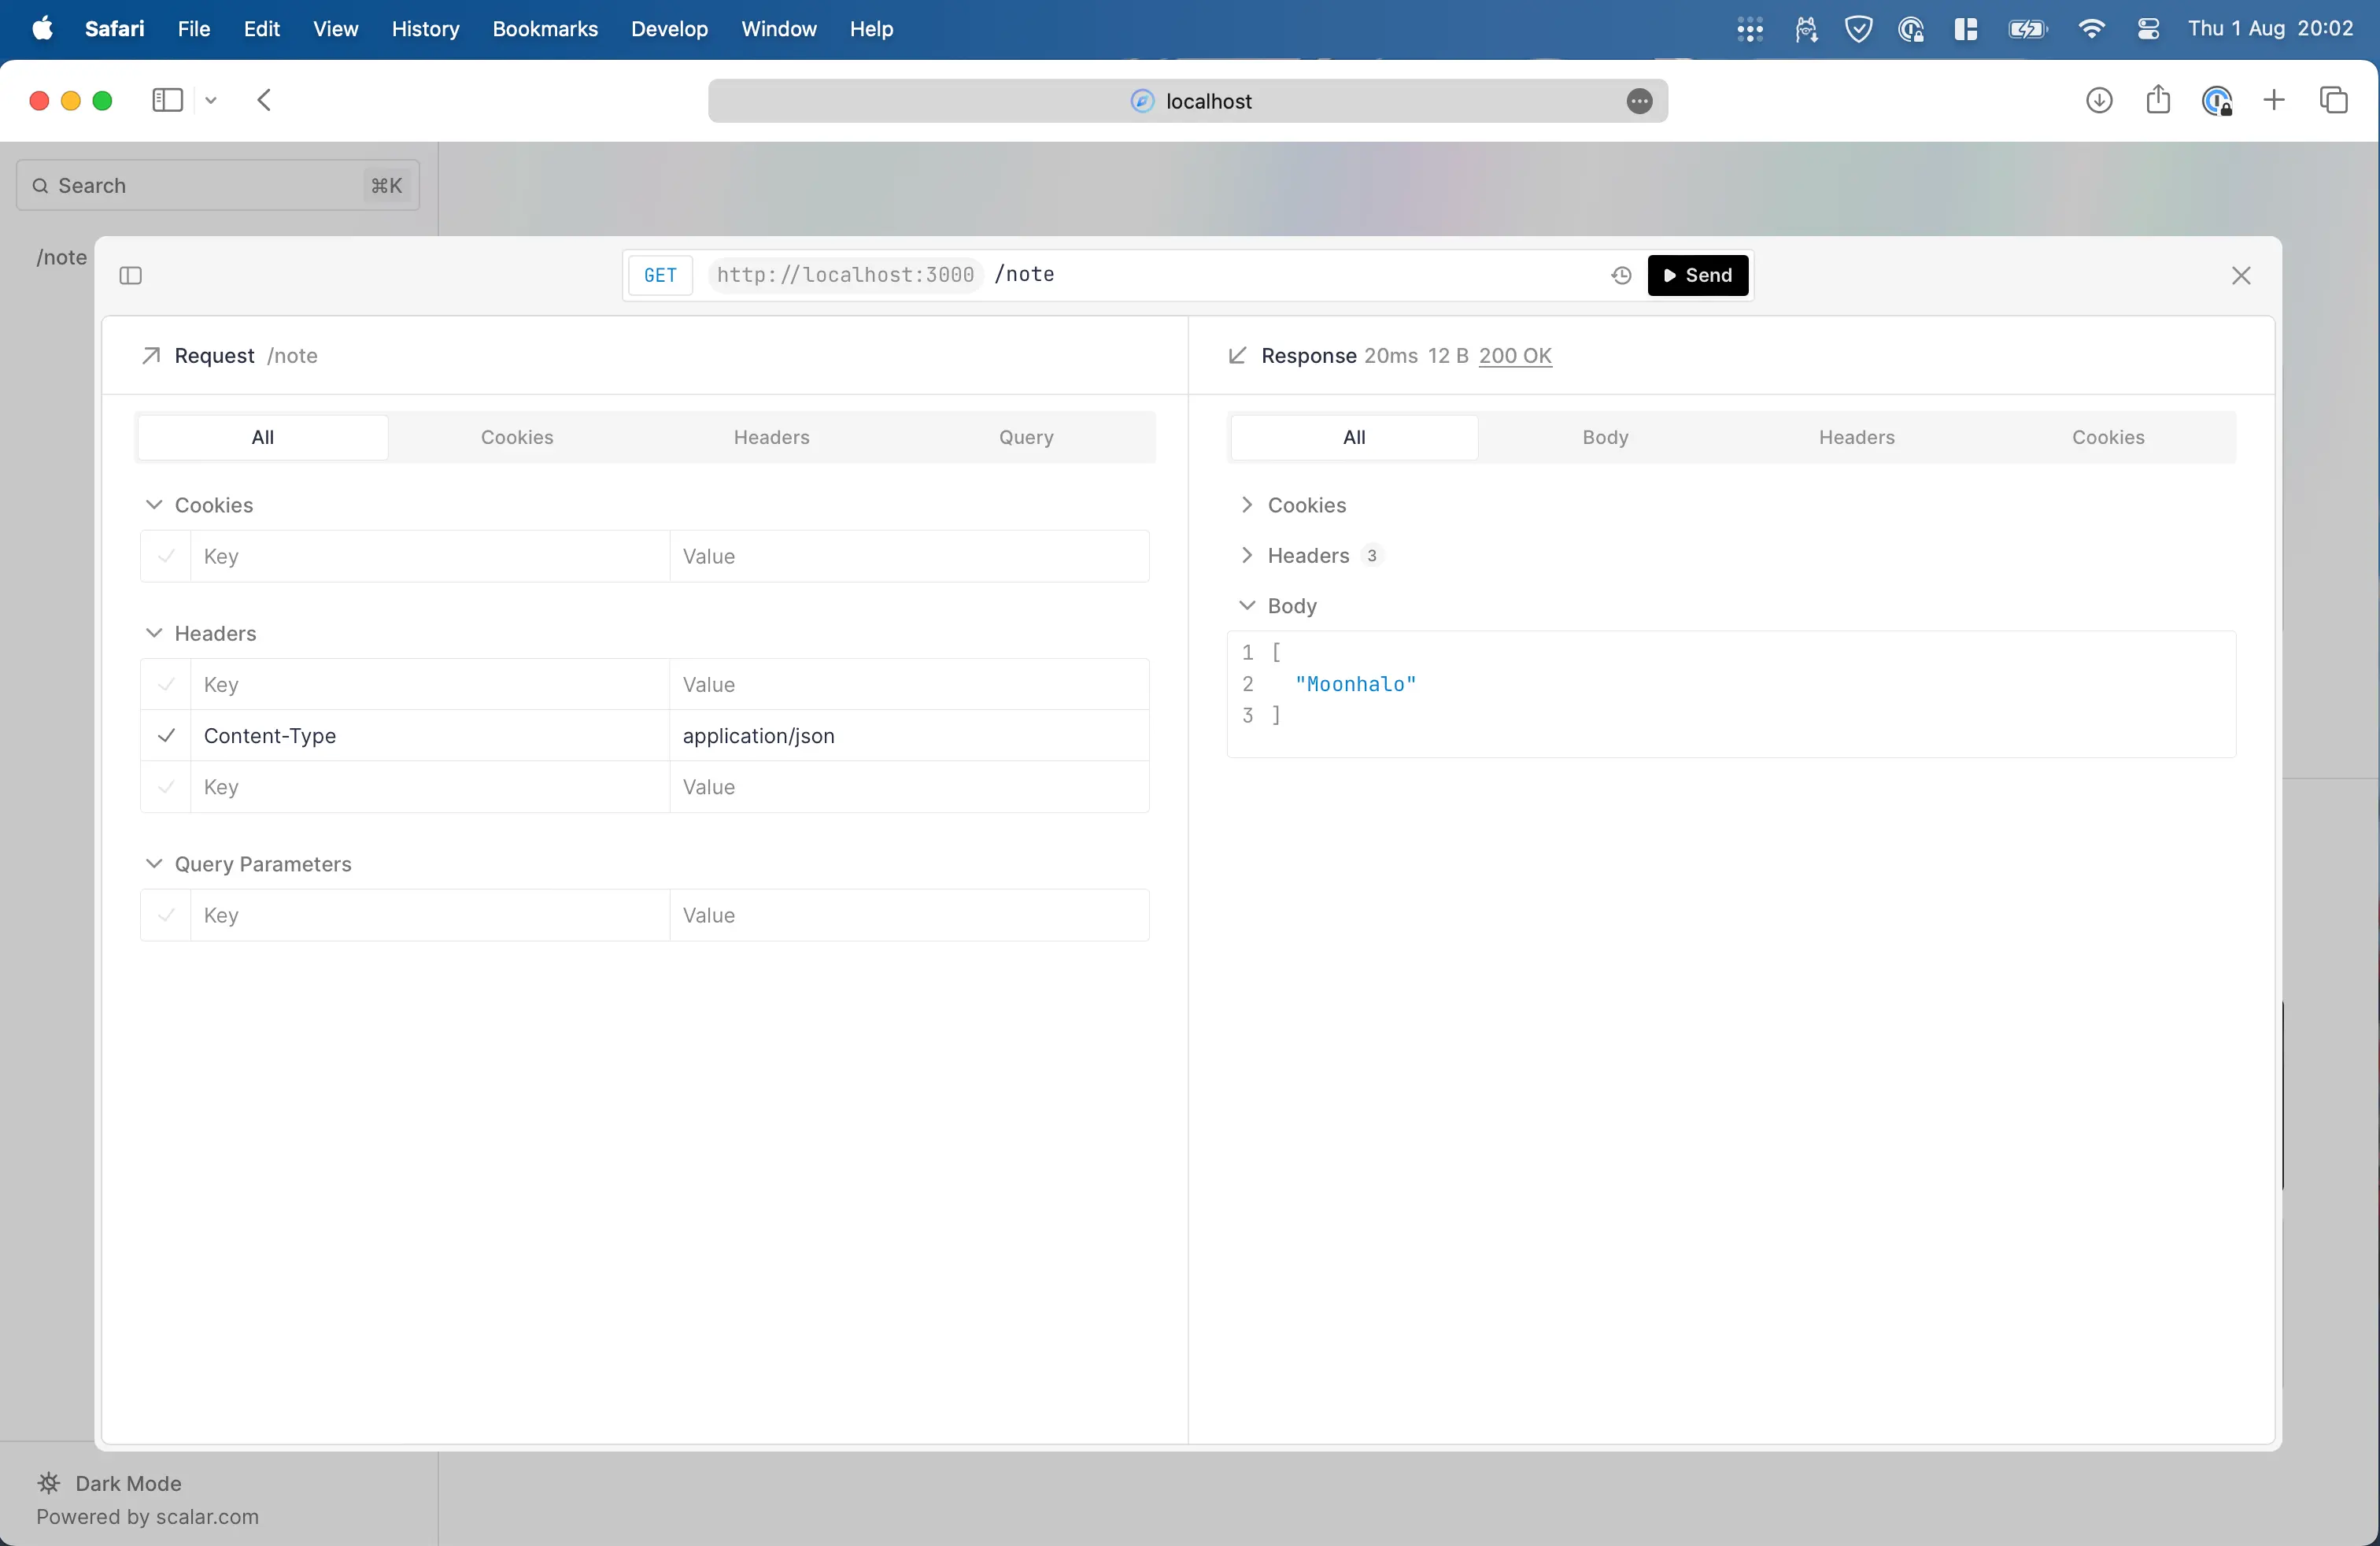
.get('/note', ({ note }) => note.data)
.listen(3000)decorate 允许我们将单例类注入 Elysia 实例,以便我们在路由处理程序中访问它。
¥decorate allows us to inject a singleton class into the Elysia instance, allowing us to access it in the route handler.
打开 http://localhost:3000/note,我们应该会在屏幕上看到 ["月晕"]。
¥Open http://localhost:3000/note, we should see ["Moonhalo"] on the screen.
有关 Scalar 文档,我们可能需要刷新页面才能看到新的更改。
¥For Scalar documentation, we may need to reload the page to see the new changes.
路径参数
¥Path parameter
现在,让我们通过索引检索一条注意。
¥Now let's retrieve a note by its index.
我们可以通过在路径参数前添加冒号来定义路径参数。
¥We can define a path parameter by prefixing it with a colon.
typescript
import { Elysia } from 'elysia'
import { openapi } from '@elysiajs/openapi'
class Note {
constructor(public data: string[] = ['Moonhalo']) {}
}
const app = new Elysia()
.use(openapi())
.decorate('note', new Note())
.get('/note', ({ note }) => note.data)
.get('/note/:index', ({ note, params: { index } }) => {
return note.data[index] })
.listen(3000)让我们暂时忽略错误。
¥Let's ignore the error for now.
打开 http://localhost:3000/note/0,我们应该会在屏幕上看到 Moonhalo。
¥Open http://localhost:3000/note/0, we should see Moonhalo on the screen.
path 参数允许我们从 URL 中检索特定部分。在我们的例子中,我们从 /note/0 检索一个 "0" 并将其放入名为 index 的变量中。
¥The path parameter allows us to retrieve a specific part from the URL. In our case, we retrieve a "0" from /note/0 put into a variable named index.
验证
¥Validation
上述错误是一个警告,提示路径参数可以是任意字符串,而数组索引应为数字。
¥The error above is a warning that the path parameter can be any string, while an array index should be a number.
例如,/note/0 有效,但 /note/zero 无效。
¥For example, /note/0 is valid, but /note/zero is not.
我们可以通过声明一个模式来强制执行和验证类型:
¥We can enforce and validate type by declaring a schema:
typescript
import { Elysia, t } from 'elysia'
import { openapi } from '@elysiajs/openapi'

class Note {
    constructor(public data: string[] = ['Moonhalo']) {}
}

const app = new Elysia()
    .use(openapi())
    .decorate('note', new Note())
    .get('/note', ({ note }) => note.data)
    .get(
        '/note/:index',
        ({ note, params: { index } }) => {
            return note.data[index]
        },
        {
            params: t.Object({
                index: t.Number()
            })
        }
    )
    .listen(3000)
我们从 Elysia 导入 t 来定义路径参数的模式。
¥We import t from Elysia to define a schema for the path parameter.
现在,如果我们尝试访问 http://localhost:3000/note/abc,我们应该会看到一条错误消息。
¥Now, if we try to access http://localhost:3000/note/abc, we should see an error message.
此代码解决了我们之前由于 TypeScript 警告而看到的错误。
¥This code resolves the error we saw earlier because of a TypeScript warning.
Elysia 模式不仅在运行时强制执行验证,还会推断 TypeScript 类型以进行自动补齐和提前检查错误,并提供 Scalar 文档。
¥Elysia schema doesn't only enforce validation on the runtime, but it also infers a TypeScript type for auto-completion and checking error ahead of time, and a Scalar documentation.
大多数框架只提供其中一项功能,或者单独提供,需要我们分别更新每个功能,但 Elysia 将所有功能都作为单一事实来源提供。
¥Most frameworks provide only one of these features or provide them separately requiring us to update each one separately, but Elysia provides all of them as a Single Source of Truth.
验证类型
¥Validation type
Elysia 提供以下属性的验证:
¥Elysia provides validation for the following properties:
params - 路径参数
query - URL 查询字符串
body - 请求正文
headers - 请求头
cookie - cookie
response - 响应正文
它们都与上面的示例共享相同的语法。
¥All of them share the same syntax as the example above.
状态码
¥Status code
默认情况下,Elysia 将为所有路由返回状态码 200,即使响应为错误。
¥By default, Elysia will return a status code of 200 for all routes even if the response is an error.
例如,如果我们尝试访问 http://localhost:3000/note/1,我们应该在屏幕上看到 undefined,而这不应该是 200 状态码(OK)。
¥For example, if we try to access http://localhost:3000/note/1, we should see undefined on the screen which shouldn't be a 200 status code (OK).
我们可以通过返回错误来更改状态码。
¥We can change the status code by returning an error
typescript
import { Elysia, t } from 'elysia'
import { openapi } from '@elysiajs/openapi'

class Note {
    constructor(public data: string[] = ['Moonhalo']) {}
}

const app = new Elysia()
    .use(openapi())
    .decorate('note', new Note())
    .get('/note', ({ note }) => note.data)
    .get(
        '/note/:index',
        ({ note, params: { index }, status }) => {
            return note.data[index] ?? status(404)
        },
        {
            params: t.Object({
                index: t.Number()
            })
        }
    )
    .listen(3000)
现在,如果我们尝试访问 http://localhost:3000/note/1,我们应该会在屏幕上看到“未找到”消息,状态码为 404。
¥Now, if we try to access http://localhost:3000/note/1, we should see Not Found on the screen with a status code of 404.
我们还可以通过将字符串传递给错误函数来返回自定义消息。
¥We can also return a custom message by passing a string to the error function.
typescript
import { Elysia, t } from 'elysia'
import { openapi } from '@elysiajs/openapi'

class Note {
    constructor(public data: string[] = ['Moonhalo']) {}
}

const app = new Elysia()
    .use(openapi())
    .decorate('note', new Note())
    .get('/note', ({ note }) => note.data)
    .get(
        '/note/:index',
        ({ note, params: { index }, status }) => {
            return note.data[index] ?? status(404, 'oh no :(')
        },
        {
            params: t.Object({
                index: t.Number()
            })
        }
    )
    .listen(3000)
插件
¥Plugin
主实例开始变得拥挤,我们可以将路由处理程序移至单独的文件并将其作为插件导入。
¥The main instance is starting to get crowded, we can move the route handler to a separate file and import it as a plugin.
创建一个名为 note.ts 的新文件:
¥Create a new file named note.ts:
typescript
import { Elysia, t } from 'elysia'

class Note {
    constructor(public data: string[] = ['Moonhalo']) {}
}

export const note = new Elysia()
    .decorate('note', new Note())
    .get('/note', ({ note }) => note.data)
    .get(
        '/note/:index',
        ({ note, params: { index }, status }) => {
            return note.data[index] ?? status(404, 'oh no :(')
        },
        {
            params: t.Object({
                index: t.Number()
            })
        }
    )
然后在 index.ts 文件中,将注释应用到主实例中:
¥Then on the index.ts, apply note into the main instance:
typescript
import { Elysia, t } from 'elysia'
import { openapi } from '@elysiajs/openapi'

import { note } from './note'

class Note {
    constructor(public data: string[] = ['Moonhalo']) {}
}

const app = new Elysia()
    .use(openapi())
    .use(note)
    .decorate('note', new Note())
    .get('/note', ({ note }) => note.data)
    .get(
        '/note/:index',
        ({ note, params: { index }, status }) => {
            return note.data[index] ?? status(404, 'oh no :(')
        },
        {
            params: t.Object({
                index: t.Number()
            })
        }
    )
    .listen(3000)
打开 http://localhost:3000/note/1,你应该会像之前一样再次看到“oh no 😦”。
¥Open http://localhost:3000/note/1 and you should see oh no 😦 again like before.
我们刚刚通过声明一个新的 Elysia 实例创建了一个注意插件。
¥We have just created a note plugin, by declaring a new Elysia instance.
每个插件都是 Elysia 的一个独立实例,它拥有自己的路由、中间件和装饰器,这些可以应用于其他实例。
¥Each plugin is a separate instance of Elysia which has its own routes, middlewares, and decorators which can be applied to other instances.
应用 CRUD
¥Applying CRUD
我们可以应用相同的模式来创建、更新和删除路由。
¥We can apply the same pattern to create, update, and delete routes.
typescript
import { Elysia, t } from 'elysia'

class Note {
    constructor(public data: string[] = ['Moonhalo']) {}

    add(note: string) {
        this.data.push(note)

        return this.data
    }

    remove(index: number) {
        return this.data.splice(index, 1)
    }

    update(index: number, note: string) {
        return (this.data[index] = note)
    }
}

export const note = new Elysia()
    .decorate('note', new Note())
    .get('/note', ({ note }) => note.data)
    .put('/note', ({ note, body: { data } }) => note.add(data), {
        body: t.Object({
            data: t.String()
        })
    })
    .get(
        '/note/:index',
        ({ note, params: { index }, status }) => {
            return note.data[index] ?? status(404, 'Not Found :(')
        },
        {
            params: t.Object({
                index: t.Number()
            })
        }
    )
    .delete(
        '/note/:index',
        ({ note, params: { index }, status }) => {
            if (index in note.data) return note.remove(index)

            return status(422)
        },
        {
            params: t.Object({
                index: t.Number()
            })
        }
    )
    .patch(
        '/note/:index',
        ({ note, params: { index }, body: { data }, status }) => {
            if (index in note.data) return note.update(index, data)

            return status(422)
        },
        {
            params: t.Object({
                index: t.Number()
            }),
            body: t.Object({
                data: t.String()
            })
        }
    )
现在让我们打开 http://localhost:3000/openapi 并尝试进行 CRUD 操作。
¥Now let's open http://localhost:3000/openapi and try playing around with CRUD operations.
组
¥Group
仔细观察,我们会发现 note 插件中的所有路由都共享一个 /note 前缀。
¥If we look closely, all of the routes in the note plugin share a /note prefix.
我们可以通过声明前缀来简化此过程。
¥We can simplify this by declaring prefix
typescript
export const note = new Elysia({ prefix: '/note' })
    .decorate('note', new Note())
    .get('/', ({ note }) => note.data)
    .put('/', ({ note, body: { data } }) => note.add(data), {
        body: t.Object({
            data: t.String()
        })
    })
    .get(
        '/:index',
        ({ note, params: { index }, status }) => {
            return note.data[index] ?? status(404, 'Not Found :(')
        },
        {
            params: t.Object({
                index: t.Number()
            })
        }
    )
    .delete(
        '/:index',
        ({ note, params: { index }, status }) => {
            if (index in note.data) return note.remove(index)

            return status(422)
        },
        {
            params: t.Object({
                index: t.Number()
            })
        }
    )
    .patch(
        '/:index',
        ({ note, params: { index }, body: { data }, status }) => {
            if (index in note.data) return note.update(index, data)

            return status(422)
        },
        {
            params: t.Object({
                index: t.Number()
            }),
            body: t.Object({
                data: t.String()
            })
        }
    )
守护
¥Guard
现在我们可能会注意到插件中有几个路由具有参数验证功能。
¥Now we may notice that there are several routes in plugin that has params validation.
我们可以定义一个守卫来将验证应用于插件中的路由。
¥We may define a guard to apply validation to routes in the plugin.
typescript
export const note = new Elysia({ prefix: '/note' })
    .decorate('note', new Note())
    .get('/', ({ note }) => note.data)
    .put('/', ({ note, body: { data } }) => note.add(data), {
        body: t.Object({
            data: t.String()
        })
    })
    .guard({
        params: t.Object({
            index: t.Number()
        })
    })
    .get(
        '/:index',
        ({ note, params: { index }, status }) => {
            return note.data[index] ?? status(404, 'Not Found :(')
        },
        {
            params: t.Object({
                index: t.Number()
            })
        }
    )
    .delete(
        '/:index',
        ({ note, params: { index }, status }) => {
            if (index in note.data) return note.remove(index)

            return status(422)
        },
        {
            params: t.Object({
                index: t.Number()
            })
        }
    )
    .patch(
        '/:index',
        ({ note, params: { index }, body: { data }, status }) => {
            if (index in note.data) return note.update(index, data)

            return status(422)
        },
        {
            params: t.Object({
                index: t.Number()
            }),
            body: t.Object({
                data: t.String()
            })
        }
    )
在调用 guard 并将其绑定到插件后,验证将应用于所有路由。
¥Validation will be applied to all routes after guard is called and tied to the plugin.
生命周期
¥Lifecycle
现在在实际使用中,我们可能需要在处理请求之前执行一些操作,例如记录日志。
¥Now in real-world usage, we may want to do something like logging before the request is processed.
与其为每个路由内联 console.log,不如应用一个生命周期,在请求处理之前/之后进行拦截。
¥Instead of inline console.log for each route, we may apply a lifecycle that intercepts the request before/after it is processed.
我们可以使用多种生命周期,但在本例中我们将使用 onTransform。
¥There are several lifecycles that we can use, but in this case we will be using onTransform.
typescript
export const note = new Elysia({ prefix: '/note' })
    .decorate('note', new Note())
    .onTransform(function log({ body, params, path, request: { method } }) {
        console.log(`${method} ${path}`, {
            body,
            params
        })
    })
    .get('/', ({ note }) => note.data)
    .put('/', ({ note, body: { data } }) => note.add(data), {
        body: t.Object({
            data: t.String()
        })
    })
    .guard({
        params: t.Object({
            index: t.Number()
        })
    })
    .get('/:index', ({ note, params: { index }, status }) => {
        return note.data[index] ?? status(404, 'Not Found :(')
    })
    .delete('/:index', ({ note, params: { index }, status }) => {
        if (index in note.data) return note.remove(index)

        return status(422)
    })
    .patch(
        '/:index',
        ({ note, params: { index }, body: { data }, status }) => {
            if (index in note.data) return note.update(index, data)

            return status(422)
        },
        {
            body: t.Object({
                data: t.String()
            })
        }
    )
onTransform 在路由之后、验证之前调用,因此我们可以执行一些操作,例如记录定义的请求,而不会触发 404 Not found 路由。
¥onTransform is called after routing but before validation, so we can do something like logging the request that is defined without triggering the 404 Not found route.
这使我们能够在处理请求之前记录日志,并且可以看到请求主体和路径参数。
¥This allows us to log the request before it is processed, and we can see the request body and path parameters.
范围
¥Scope
默认情况下,生命周期钩子被封装。Hook 应用于同一实例中的路由,不应用于其他插件(未在同一插件中定义的路由)。
¥By default, the lifecycle hook is encapsulated. Hook is applied to routes in the same instance, and is not applied to other plugins (routes that are not defined in the same plugin).
这意味着 onTransform 钩子中的日志函数将不会在其他实例上被调用,除非我们将其明确定义为 scoped 或 global。
¥This means the log function, in the onTransform hook, will not be called on other instances, unless we explicitly defined it as scoped or global.
身份验证
¥Authentication
现在我们可能想在路由中添加限制,这样只有注意的所有者才能更新或删除它。
¥Now we may want to add restrictions to our routes, so only the owner of the note can update or delete it.
让我们创建一个 user.ts 文件来处理用户身份验证:
¥Let's create a user.ts file that will handle the user authentication:
typescript
import { Elysia, t } from 'elysia'
export const user = new Elysia({ prefix: '/user' })
    .state({
        user: {} as Record<string, string>,
        session: {} as Record<number, string>
    })
    .put(
        '/sign-up',
        async ({ body: { username, password }, store, status }) => {
            if (store.user[username])
                return status(400, {
                    success: false,
                    message: 'User already exists'
                })
            store.user[username] = await Bun.password.hash(password)
            return {
                success: true,
                message: 'User created'
            }
        },
        {
            body: t.Object({
                username: t.String({ minLength: 1 }),
                password: t.String({ minLength: 8 })
            })
        }
    )
    .post(
        '/sign-in',
        async ({
            store: { user, session },
            status,
            body: { username, password },
            cookie: { token }
        }) => {
            if (
                !user[username] ||
                !(await Bun.password.verify(password, user[username]))
            )
                return status(400, {
                    success: false,
                    message: 'Invalid username or password'
                })

            const key = crypto.getRandomValues(new Uint32Array(1))[0]
            session[key] = username
            token.value = key

            return {
                success: true,
                message: `Signed in as ${username}`
            }
        },
        {
            body: t.Object({
                username: t.String({ minLength: 1 }),
                password: t.String({ minLength: 8 })
            }),
            cookie: t.Cookie(
                {
                    token: t.Number()
                },
                {
                    secrets: 'seia'
                }
            )
        }
    )
现在有很多事情需要解开:
¥Now there are a lot of things to unwrap here:
我们创建了一个包含两个路由的新实例,分别用于注册和登录。
在实例中,我们定义了一个内存存储
user和session。2.1
user将保存username和password的键值对2.2
session将保存session和username的键值对
在
/sign-up中,我们使用 argon2id 插入用户名和哈希密码在
/sign-in中,我们执行以下操作:4.1 检查用户是否存在并验证密码
4.2 如果密码匹配,则在
session中生成一个新的会话4.3 将会话的值设置为 cookie
token4.4 将
secret附加到 cookie 中以添加哈希值并阻止攻击者篡改 cookie
提示
由于我们使用内存存储,每次重新加载或每次编辑代码时数据都会被清除。
¥As we are using an in-memory store, the data are wiped out every reload or every time we edit the code.
我们将在本教程的后续部分修复该问题。
¥We will fix that in the later part of the tutorial.
现在,如果我们想检查用户是否已登录,我们可以检查 token cookie 的值并与 session 存储进行检查。
¥Now if we want to check if a user is signed in, we could check for value of token cookie and check with the session store.
参考模型
¥Reference Model
然而,我们可以认识到 /sign-in 和 /sign-up 都共享相同的 body 模型。
¥However, we can recognize that both /sign-in and /sign-up both share the same body model.
与其到处复制粘贴模型,不如使用引用模型,通过指定名称来重用它。
¥Instead of copy-pasting the model all over the place, we could use a reference model to reuse the model by specifying a name.
要创建参考模型,我们可以使用 .model 并传递模型的名称和值:
¥To create a reference model, we may use .model and pass the name and the value of models:
typescript
import { Elysia, t } from 'elysia'

export const user = new Elysia({ prefix: '/user' })
    .state({
        user: {} as Record<string, string>,
        session: {} as Record<number, string>
    })
    .model({
        signIn: t.Object({
            username: t.String({ minLength: 1 }),
            password: t.String({ minLength: 8 })
        }),
        session: t.Cookie(
            {
                token: t.Number()
            },
            {
                secrets: 'seia'
            }
        ),
        optionalSession: t.Cookie(
            {
                token: t.Optional(t.Number())
            },
            {
                secrets: 'seia'
            }
        )
    })
    .put(
        '/sign-up',
        async ({ body: { username, password }, store, status }) => {
            if (store.user[username])
                return status(400, {
                    success: false,
                    message: 'User already exists'
                })
            store.user[username] = await Bun.password.hash(password)

            return {
                success: true,
                message: 'User created'
            }
        },
        {
            body: 'signIn'
        }
    )
    .post(
        '/sign-in',
        async ({
            store: { user, session },
            status,
            body: { username, password },
            cookie: { token }
        }) => {
            if (
                !user[username] ||
                !(await Bun.password.verify(password, user[username]))
            )
                return status(400, {
                    success: false,
                    message: 'Invalid username or password'
                })

            const key = crypto.getRandomValues(new Uint32Array(1))[0]
            session[key] = username
            token.value = key

            return {
                success: true,
                message: `Signed in as ${username}`
            }
        },
        {
            body: 'signIn',
            cookie: 'session'
        }
    )
添加一个或多个模型后,我们可以通过在架构中引用它们的名称来重用它们,而无需提供文字类型,同时提供相同的功能和类型安全性。
¥After adding a model/models, we can reuse them by referencing their name in the schema instead of providing a literal type while providing the same functionality and type safety.
Elysia.model 可以接受多个重载:
¥Elysia.model could accept multiple overloads:
- 提供一个对象,将所有键值对注册为模型
- 提供一个函数,访问所有之前的模型,然后返回新的模型
最后,我们可以添加 /profile 和 /sign-out 路由,如下所示:
¥Finally, we could add the /profile and /sign-out routes as follows:
typescript
import { Elysia, t } from 'elysia'

export const user = new Elysia({ prefix: '/user' })
    .state({
        user: {} as Record<string, string>,
        session: {} as Record<number, string>
    })
    .model({
        signIn: t.Object({
            username: t.String({ minLength: 1 }),
            password: t.String({ minLength: 8 })
        }),
        session: t.Cookie(
            {
                token: t.Number()
            },
            {
                secrets: 'seia'
            }
        ),
        optionalSession: t.Cookie(
            {
                token: t.Optional(t.Number())
            },
            {
                secrets: 'seia'
            }
        )
    })
    .put(
        '/sign-up',
        async ({ body: { username, password }, store, status }) => {
            if (store.user[username])
                return status(400, {
                    success: false,
                    message: 'User already exists'
                })

            store.user[username] = await Bun.password.hash(password)

            return {
                success: true,
                message: 'User created'
            }
        },
        {
            body: 'signIn'
        }
    )
    .post(
        '/sign-in',
        async ({
            store: { user, session },
            status,
            body: { username, password },
            cookie: { token }
        }) => {
            if (
                !user[username] ||
                !(await Bun.password.verify(password, user[username]))
            )
                return status(400, {
                    success: false,
                    message: 'Invalid username or password'
                })

            const key = crypto.getRandomValues(new Uint32Array(1))[0]
            session[key] = username
            token.value = key

            return {
                success: true,
                message: `Signed in as ${username}`
            }
        },
        {
            body: 'signIn',
            cookie: 'optionalSession'
        }
    )
    .get(
        '/sign-out',
        ({ cookie: { token } }) => {
            token.remove()
            return {
                success: true,
                message: 'Signed out'
            }
        },
        {
            cookie: 'optionalSession'
        }
    )
    .get(
        '/profile',
        ({ cookie: { token }, store: { session }, status }) => {
            const username = session[token.value]
            if (!username)
                return status(401, {
                    success: false,
                    message: 'Unauthorized'
                })
            return {
                success: true,
                username
            }
        },
        {
            cookie: 'session'
        }
    )
由于我们要在 note 中应用 authorization,因此需要重复两件事:
¥As we are going to apply authorization in the note, we are going to need to repeat two things:
- 检查用户是否存在
- 获取用户 ID(本例中为 'username')
对于 1.我们可以使用宏来代替守卫。
¥For 1. instead of using guard, we could use a macro.
插件数据去重
¥Plugin deduplication
由于我们要在多个模块(用户和注释)中重复使用此钩子,因此我们需要提取服务(实用程序)部分并将其应用于这两个模块。
¥As we are going to reuse this hook in multiple modules (user, and note), let's extract the service (utility) part out and apply it to both modules.
ts
// @errors: 2538
import { Elysia, t } from 'elysia'

export const userService = new Elysia({ name: 'user/service' })
    .state({
        user: {} as Record<string, string>,
        session: {} as Record<number, string>
    })
    .model({
        signIn: t.Object({
            username: t.String({ minLength: 1 }),
            password: t.String({ minLength: 8 })
        }),
        session: t.Cookie(
            {
                token: t.Number()
            },
            {
                secrets: 'seia'
            }
        ),
        optionalSession: t.Cookie(
            {
                token: t.Optional(t.Number())
            },
            {
                secrets: 'seia'
            }
        )
    })

export const user = new Elysia({ prefix: '/user' })
    .use(userService)
    .state({
        user: {} as Record<string, string>,
        session: {} as Record<number, string>
    })
    .model({
        signIn: t.Object({
            username: t.String({ minLength: 1 }),
            password: t.String({ minLength: 8 })
        }),
        session: t.Cookie(
            {
                token: t.Number()
            },
            {
                secrets: 'seia'
            }
        ),
        optionalSession: t.Cookie(
            {
                token: t.Optional(t.Number())
            },
            {
                secrets: 'seia'
            }
        )
    })
此处的 name 属性非常重要,因为它是插件的唯一标识符,用于防止重复实例(类似于单例)。
¥The name property here is very important, as it's a unique identifier for the plugin to prevent duplicate instances (like a singleton).
如果我们不使用插件来定义实例,则每次使用插件时都会注册钩子/生命周期和路由。
¥If we were to define the instance without the plugin, hook/lifecycle and routes are going to be registered every time the plugin is used.
我们的目的是将此插件(服务)应用于多个模块以提供实用功能,这使得数据去重非常重要,因为生命周期不应该被注册两次。
¥Our intention is to apply this plugin (service) to multiple modules to provide utility function, this make deduplication very important as life-cycle shouldn't be registered twice.
宏
¥Macro
宏允许我们定义一个带有自定义生命周期管理的自定义钩子。
¥Macro allows us to define a custom hook with custom life-cycle management.
要定义宏,我们可以按如下方式使用 .macro:
¥To define a macro, we could use .macro as follows:
ts
import { Elysia, t } from 'elysia'

export const userService = new Elysia({ name: 'user/service' })
    .state({
        user: {} as Record<string, string>,
        session: {} as Record<number, string>
    })
    .model({
        signIn: t.Object({
            username: t.String({ minLength: 1 }),
            password: t.String({ minLength: 8 })
        }),
        session: t.Cookie(
            {
                token: t.Number()
            },
            {
                secrets: 'seia'
            }
        ),
        optionalSession: t.Cookie(
            {
                token: t.Optional(t.Number())
            },
            {
                secrets: 'seia'
            }
        )
    })
    .macro({
        isSignIn(enabled: boolean) {
            if (!enabled) return

            return {
                beforeHandle({
                    status,
                    cookie: { token },
                    store: { session }
                }) {
                    if (!token.value)
                        return status(401, {
                            success: false,
                            message: 'Unauthorized'
                        })

                    const username = session[token.value as unknown as number]

                    if (!username)
                        return status(401, {
                            success: false,
                            message: 'Unauthorized'
                        })
                }
            }
        }
    })
我们刚刚创建了一个名为 isSignIn 的新宏,它接受一个 boolean 值,如果 boolean 为 true,则添加一个 onBeforeHandle 事件,该事件在验证之后但在主处理程序之前执行,从而允许我们在此处提取身份验证逻辑。
¥We have just created a new macro name isSignIn that accepts a boolean value, if it is true, then we add an onBeforeHandle event that executes after validation but before the main handler, allowing us to extract authentication logic here.
要使用宏,只需按如下方式指定 isSignIn: true:
¥To use the macro, simply specify isSignIn: true as follows:
ts
import { Elysia, t } from 'elysia'

export const user = new Elysia({ prefix: '/user' }).use(userService).get(
    '/profile',
    ({ cookie: { token }, store: { session }, status }) => {
        const username = session[token.value]

        if (!username)
            return status(401, {
                success: false,
                message: 'Unauthorized'
            })

        return {
            success: true,
            username
        }
    },
    {
        isSignIn: true,
        cookie: 'session'
    }
)
由于我们指定了 isSignIn,我们可以提取命令式检查部分,并在多个路由上重用相同的逻辑,而无需重复复制粘贴相同的代码。
¥As we specified isSignIn, we can extract the imperative checking part, and reuse the same logic on multiple routes without copy-pasting the same code all over again.
提示
这看起来像是一个很小的代码更改,用来换取更大的样板代码,但随着服务器变得越来越复杂,用户检查也可能发展成为一个非常复杂的机制。
¥This may seem like a small code change to trade for a larger boilerplate, but as the server grows more complex, the user-checking could also grow to be a very complex mechanism.
解析
¥Resolve
我们的最后一个目标是从令牌中获取用户名 (id)。我们可以使用 resolve 在与 store 相同的上下文中定义一个新属性,但仅在每个请求中执行它。
¥Our last objective is to get the username (id) from the token. We could use resolve to define a new property into the same context as store but only execute it per request.
与 decorate 和 store 不同,resolve 在 beforeHandle 阶段定义,否则值将在验证后可用。
¥Unlike decorate and store, resolve is defined at the beforeHandle stage or the value will be available after validation.
这确保在创建新属性之前,像 cookie: 'session' 这样的属性已经存在。
¥This ensures that the property like cookie: 'session' exists before creating a new property.
ts
export const getUserId = new Elysia()
    .use(userService)
    .guard({
        cookie: 'session'
    })
    .resolve(({ store: { session }, cookie: { token } }) => ({
        username: session[token.value]
    }))
在此示例中,我们使用 resolve 定义了一个新的属性 username,从而将获取 username 的逻辑简化为一个属性。
¥In this instance, we define a new property username by using resolve, allowing us to reduce the getting username logic into a property instead.
我们没有在这个 getUserId 实例中定义名称,因为我们希望 guard 和 resolve 能够重新应用于多个实例。
¥We don't define a name in this getUserId instance because we want guard and resolve to reapply into multiple instances.
提示
与宏相同,如果获取属性的逻辑很复杂,并且对于像这样的小操作来说可能不值得,那么 resolve 会表现良好。但由于在现实世界中,我们需要数据库连接、缓存和队列,因此它可能符合我们的描述。
¥Same as macro, resolve plays well if the logic for getting the property is complex and might not be worth it for a small operation like this. But since in the real-world we are going to need database-connection, caching, and queuing it might make it fit the narrative.
范围
¥Scope
现在,如果我们尝试使用 getUserId,我们可能会注意到属性 username 和 guard 未被应用。
¥Now if we try to apply the use of the getUserId, we might notice that the property username and guard isn't applied.
ts
export const getUserId = new Elysia()
    .use(userService)
    .guard({
        isSignIn: true,
        cookie: 'session'
    })
    .resolve(({ store: { session }, cookie: { token } }) => ({
        username: session[token.value]
    }))

export const user = new Elysia({ prefix: '/user' })
    .use(getUserId)
    .get('/profile', ({ username }) => ({
        success: true,
        username
    }))
这是因为 Elysia 封装生命周期默认会执行此操作,如 lifecycle 中所述。
¥This is because the Elysia encapsulate lifecycle does this by default as mentioned in lifecycle
这是有意为之,因为我们不希望每个模块对其他模块产生副作用。副作用可能非常难以调试,尤其是在具有多个(Elysia)依赖的大型代码库中。
¥This is intentional by design, as we don't want each module to have a side-effect to other modules. Having a side-effect can be very difficult to debug especially in a large codebase with multiple (Elysia) dependencies.
如果我们希望将生命周期应用于父级,我们可以使用以下任一方式显式地注释它可以应用于父级:
¥If we want lifecycle to be applied to the parent, we can explicitly annotate that it could be applied to the parent by using either:
- scoped - 仅适用于上一级父级,不适用于其他子级
- global - 应用于所有父级
在我们的例子中,我们希望使用 scoped,因为它仅适用于使用该服务的控制器。
¥In our case, we want to use scoped as it will apply to the controller that uses the service only.
为此,我们需要将该生命周期注释为 scoped:
¥To do this, we need to annotate that life-cycle as scoped:
typescript
export const getUserId = new Elysia()
    .use(userService)
    .guard({
        as: 'scoped',
        isSignIn: true,
        cookie: 'session'
    })
    .resolve(
        { as: 'scoped' },
        ({ store: { session }, cookie: { token } }) => ({
            username: session[token.value]
        })
    )

export const user = new Elysia({ prefix: '/user' })
    .use(getUserId)
    .get('/profile', ({ username }) => ({
        // ^?
        success: true,
        username
    }))
或者,如果我们定义了多个 scoped,我们可以使用 as 来转换多个生命周期。
¥Alternatively, if we have multiple scoped defined, we could use as to cast multiple life-cycles instead.
ts
export const getUserId = new Elysia()
    .use(userService)
    .guard({
        as: 'scoped',
        isSignIn: true,
        cookie: 'session'
    })
    .resolve(
        { as: 'scoped' },
        ({ store: { session }, cookie: { token } }) => ({
            username: session[token.value]
        })
    )
    .as('scoped')

export const user = new Elysia({ prefix: '/user' })
    .use(getUserId)
    .get('/profile', ({ username }) => ({
        success: true,
        username
    }))
两者实现的效果相同,唯一的区别在于单个或多个强制类型转换实例。
¥Both achieve the same effect, the only difference is single or multiple cast instances.
提示
封装在运行时和类型级别均有发生。这使我们能够提前捕获错误。
¥Encapsulation happens in both runtime, and type-level. This allows us to catch the error ahead of time.
最后,我们可以重用 userService 和 getUserId 来帮助我们的注意控制器进行授权。
¥Lastly, we can reuse userService and getUserId to help with authorization in our note controller.
但首先,别忘了在 index.ts 文件中导入 user:
¥But first, don't forget to import the user in the index.ts file:
typescript
import { Elysia, t } from 'elysia'
import { openapi } from '@elysiajs/openapi'

import { note } from './note'
import { user } from './user'

const app = new Elysia()
    .use(openapi())
    .use(user)
    .use(note)
    .listen(3000)
授权
¥Authorization
首先,修改 Note 类以存储创建注意的用户。
¥First, let's modify the Note class to store the user who created the note.
但是,除了定义 Memo 类型之外,我们还可以定义一个备忘 Schema 并从中推断类型,从而允许我们同步运行时和类型级别。
¥But instead of defining the Memo type, we can define a memo schema and infer the type from it, allowing us to sync runtime and type-level.
typescript
import { Elysia, t } from 'elysia'

const memo = t.Object({
	data: t.String(),
	author: t.String()
})

type Memo = typeof memo.static

class Note {
    constructor(public data: string[] = ['Moonhalo']) {}
    constructor(
		public data: Memo[] = [
			{
				data: 'Moonhalo',
				author: 'saltyaom'
			}
		]
	) {}

    add(note: string) {
    add(note: Memo) {
        this.data.push(note)

        return this.data
    }

    remove(index: number) {
        return this.data.splice(index, 1)
    }

    update(index: number, note: string) {
        return (this.data[index] = note)
    }
    update(index: number, note: Partial<Memo>) {
        return (this.data[index] = { ...this.data[index], ...note })
    }
}

export const note = new Elysia({ prefix: '/note' })
    .decorate('note', new Note())
    .model({
    	memo: t.Omit(memo, ['author'])
    })
    .onTransform(function log({ body, params, path, request: { method } }) {
        console.log(`${method} ${path}`, {
            body,
            params
        })
    })
    .get('/', ({ note }) => note.data)
    .put('/', ({ note, body: { data } }) => note.add(data), {
        body: t.Object({
            data: t.String()
        }),
    })
    .put('/', ({ note, body: { data }, username }) =>
    	note.add({ data, author: username }),
     	{
     		body: 'memo'
      	}
    )
    .guard({
        params: t.Object({
            index: t.Number()
        })
    })
    .get(
        '/:index',
        ({ note, params: { index }, status }) => {
            return note.data[index] ?? status(404, 'Not Found :(')
        }
    )
    .delete(
        '/:index',
        ({ note, params: { index }, status }) => {
            if (index in note.data) return note.remove(index)

            return status(422)
        }
    )
    .patch(
        '/:index',
        ({ note, params: { index }, body: { data }, status }) => {
            if (index in note.data) return note.update(index, data)
        ({ note, params: { index }, body: { data }, status, username }) => {
        	if (index in note.data)
         		return note.update(index, { data, author: username }))

            return status(422)
        },
        {
            body: t.Object({
                data: t.String()
            }),
            body: 'memo'
        }
    )
现在让我们导入并使用 userService 和 getUserId 将授权应用于注意控制器。
¥Now let's import, and use userService, getUserId to apply authorization to the note controller.
typescript
import { Elysia, t } from 'elysia'
import { getUserId, userService } from './user'

const memo = t.Object({
    data: t.String(),
    author: t.String()
})

type Memo = typeof memo.static

class Note {
    constructor(
        public data: Memo[] = [
            {
                data: 'Moonhalo',
                author: 'saltyaom'
            }
        ]
    ) {}

    add(note: Memo) {
        this.data.push(note)

        return this.data
    }

    remove(index: number) {
        return this.data.splice(index, 1)
    }

    update(index: number, note: Partial<Memo>) {
        return (this.data[index] = { ...this.data[index], ...note })
    }
}

export const note = new Elysia({ prefix: '/note' })
    .use(userService)
    .decorate('note', new Note())
    .model({
        memo: t.Omit(memo, ['author'])
    })
    .onTransform(function log({ body, params, path, request: { method } }) {
        console.log(`${method} ${path}`, {
            body,
            params
        })
    })
    .get('/', ({ note }) => note.data)
    .use(getUserId)
    .put(
        '/',
        ({ note, body: { data }, username }) =>
            note.add({ data, author: username }),
        {
            body: 'memo'
        }
    )
    .get(
        '/:index',
        ({ note, params: { index }, status }) => {
            return note.data[index] ?? status(404, 'Not Found :(')
        },
        {
            params: t.Object({
                index: t.Number()
            })
        }
    )
    .guard({
        params: t.Object({
            index: t.Number()
        })
    })
    .delete('/:index', ({ note, params: { index }, status }) => {
        if (index in note.data) return note.remove(index)

        return status(422)
    })
    .patch(
        '/:index',
        ({ note, params: { index }, body: { data }, status, username }) => {
            if (index in note.data)
                return note.update(index, { data, author: username })

            return status(422)
        },
        {
            isSignIn: true,
            body: 'memo'
        }
    )
就这样 🎉
¥And that's it 🎉
我们刚刚通过重用之前创建的服务实现了授权。
¥We have just implemented authorization by reusing the service we created earlier.
错误处理
¥Error handling
API 最重要的方面之一是确保一切顺利,如果出错,我们需要妥善处理。
¥One of the most important aspects of an API is to make sure nothing goes wrong, and if it does, we need to handle it properly.
我们使用 onError 生命周期来捕获服务器抛出的任何错误。
¥We use use the onError lifecycle to catch any error that is thrown in the server.
typescript
import { Elysia, t } from 'elysia'
import { openapi } from '@elysiajs/openapi'

import { note } from './note'
import { user } from './user'

const app = new Elysia()
    .use(openapi())
    .onError(({ error, code }) => {
        if (code === 'NOT_FOUND') return

        console.error(error)
    })
    .use(user)
    .use(note)
    .listen(3000)
我们刚刚添加了一个错误监听器,它将捕获服务器抛出的任何错误(404 Not Found 除外),并将其记录到控制台。
¥We have just added an error listener that will catch any error that is thrown in the server, excluding 404 Not Found and log it to the console.
提示
请注意,onError 在 use(note) 之前使用。这很重要,因为 Elysia 自上而下地应用该方法。必须在路由之前应用监听器。
¥Notice that onError is used before use(note). This is important as Elysia applies the method from top-to-bottom. The listener has to be applied before the route.
由于 onError 应用于根实例,因此无需定义作用域,因为它将应用于所有子实例。
¥And as onError is applied on the root instance, it doesn't need to define a scope as it will apply to all children instances.
返回真值将覆盖默认错误响应,因此我们可以返回继承状态码的自定义错误响应。
¥Returning a truthy value will override a default error response, so we can return a custom error response which inherits the status code.
typescript
import { Elysia, t } from 'elysia'
import { openapi } from '@elysiajs/openapi'

import { note } from './note'

const app = new Elysia()
    .use(openapi())
    .onError(({ error, code }) => {
        if (code === 'NOT_FOUND') return 'Not Found :('

        console.error(error)
    })
    .use(note)
    .listen(3000)
可观察性
¥Observability
现在我们有了一个可以运行的 API,最后一步是确保在部署服务器后一切正常。
¥Now we have a working API, a final touch is to make sure everything is working after we deployed our server.
Elysia 通过 @elysiajs/opentelemetry 插件默认支持 OpenTelemetry。
¥Elysia supports OpenTelemetry by default with the @elysiajs/opentelemetry plugin.
bash
bun add @elysiajs/opentelemetry确保 OpenTelemetry 收集器正在运行,否则我们将使用 Docker 中的 Jaeger。
¥Make sure to have an OpenTelemetry collector running otherwise we will be using Jaeger from docker.
bash
docker run --name jaeger \
  -e COLLECTOR_ZIPKIN_HOST_PORT=:9411 \
  -e COLLECTOR_OTLP_ENABLED=true \
  -p 6831:6831/udp \
  -p 6832:6832/udp \
  -p 5778:5778 \
  -p 16686:16686 \
  -p 4317:4317 \
  -p 4318:4318 \
  -p 14250:14250 \
  -p 14268:14268 \
  -p 14269:14269 \
  -p 9411:9411 \
  jaegertracing/all-in-one:latest
现在让我们将 OpenTelemetry 插件应用到我们的服务器。
¥Now let's apply the OpenTelemetry plugin to our server.
typescript
import { Elysia, t } from 'elysia'
import { opentelemetry } from '@elysiajs/opentelemetry'
import { openapi } from '@elysiajs/openapi'

import { note } from './note'
import { user } from './user'

const app = new Elysia()
    .use(opentelemetry())
    .use(openapi())
    .onError(({ error, code }) => {
        if (code === 'NOT_FOUND') return 'Not Found :('

        console.error(error)
    })
    .use(note)
    .use(user)
    .listen(3000)
现在尝试更多请求并打开 http://localhost:16686 查看跟踪信息。
¥Now try out some more requests and open http://localhost:16686 to see traces.
选择服务 Elysia 并点击“查找跟踪”,我们应该能够看到我们发出的请求列表。
¥Select service Elysia and click on Find Traces, we should be able to see a list of requests that we have made.

点击任意请求,查看每个生命周期钩子处理该请求所需的时间。
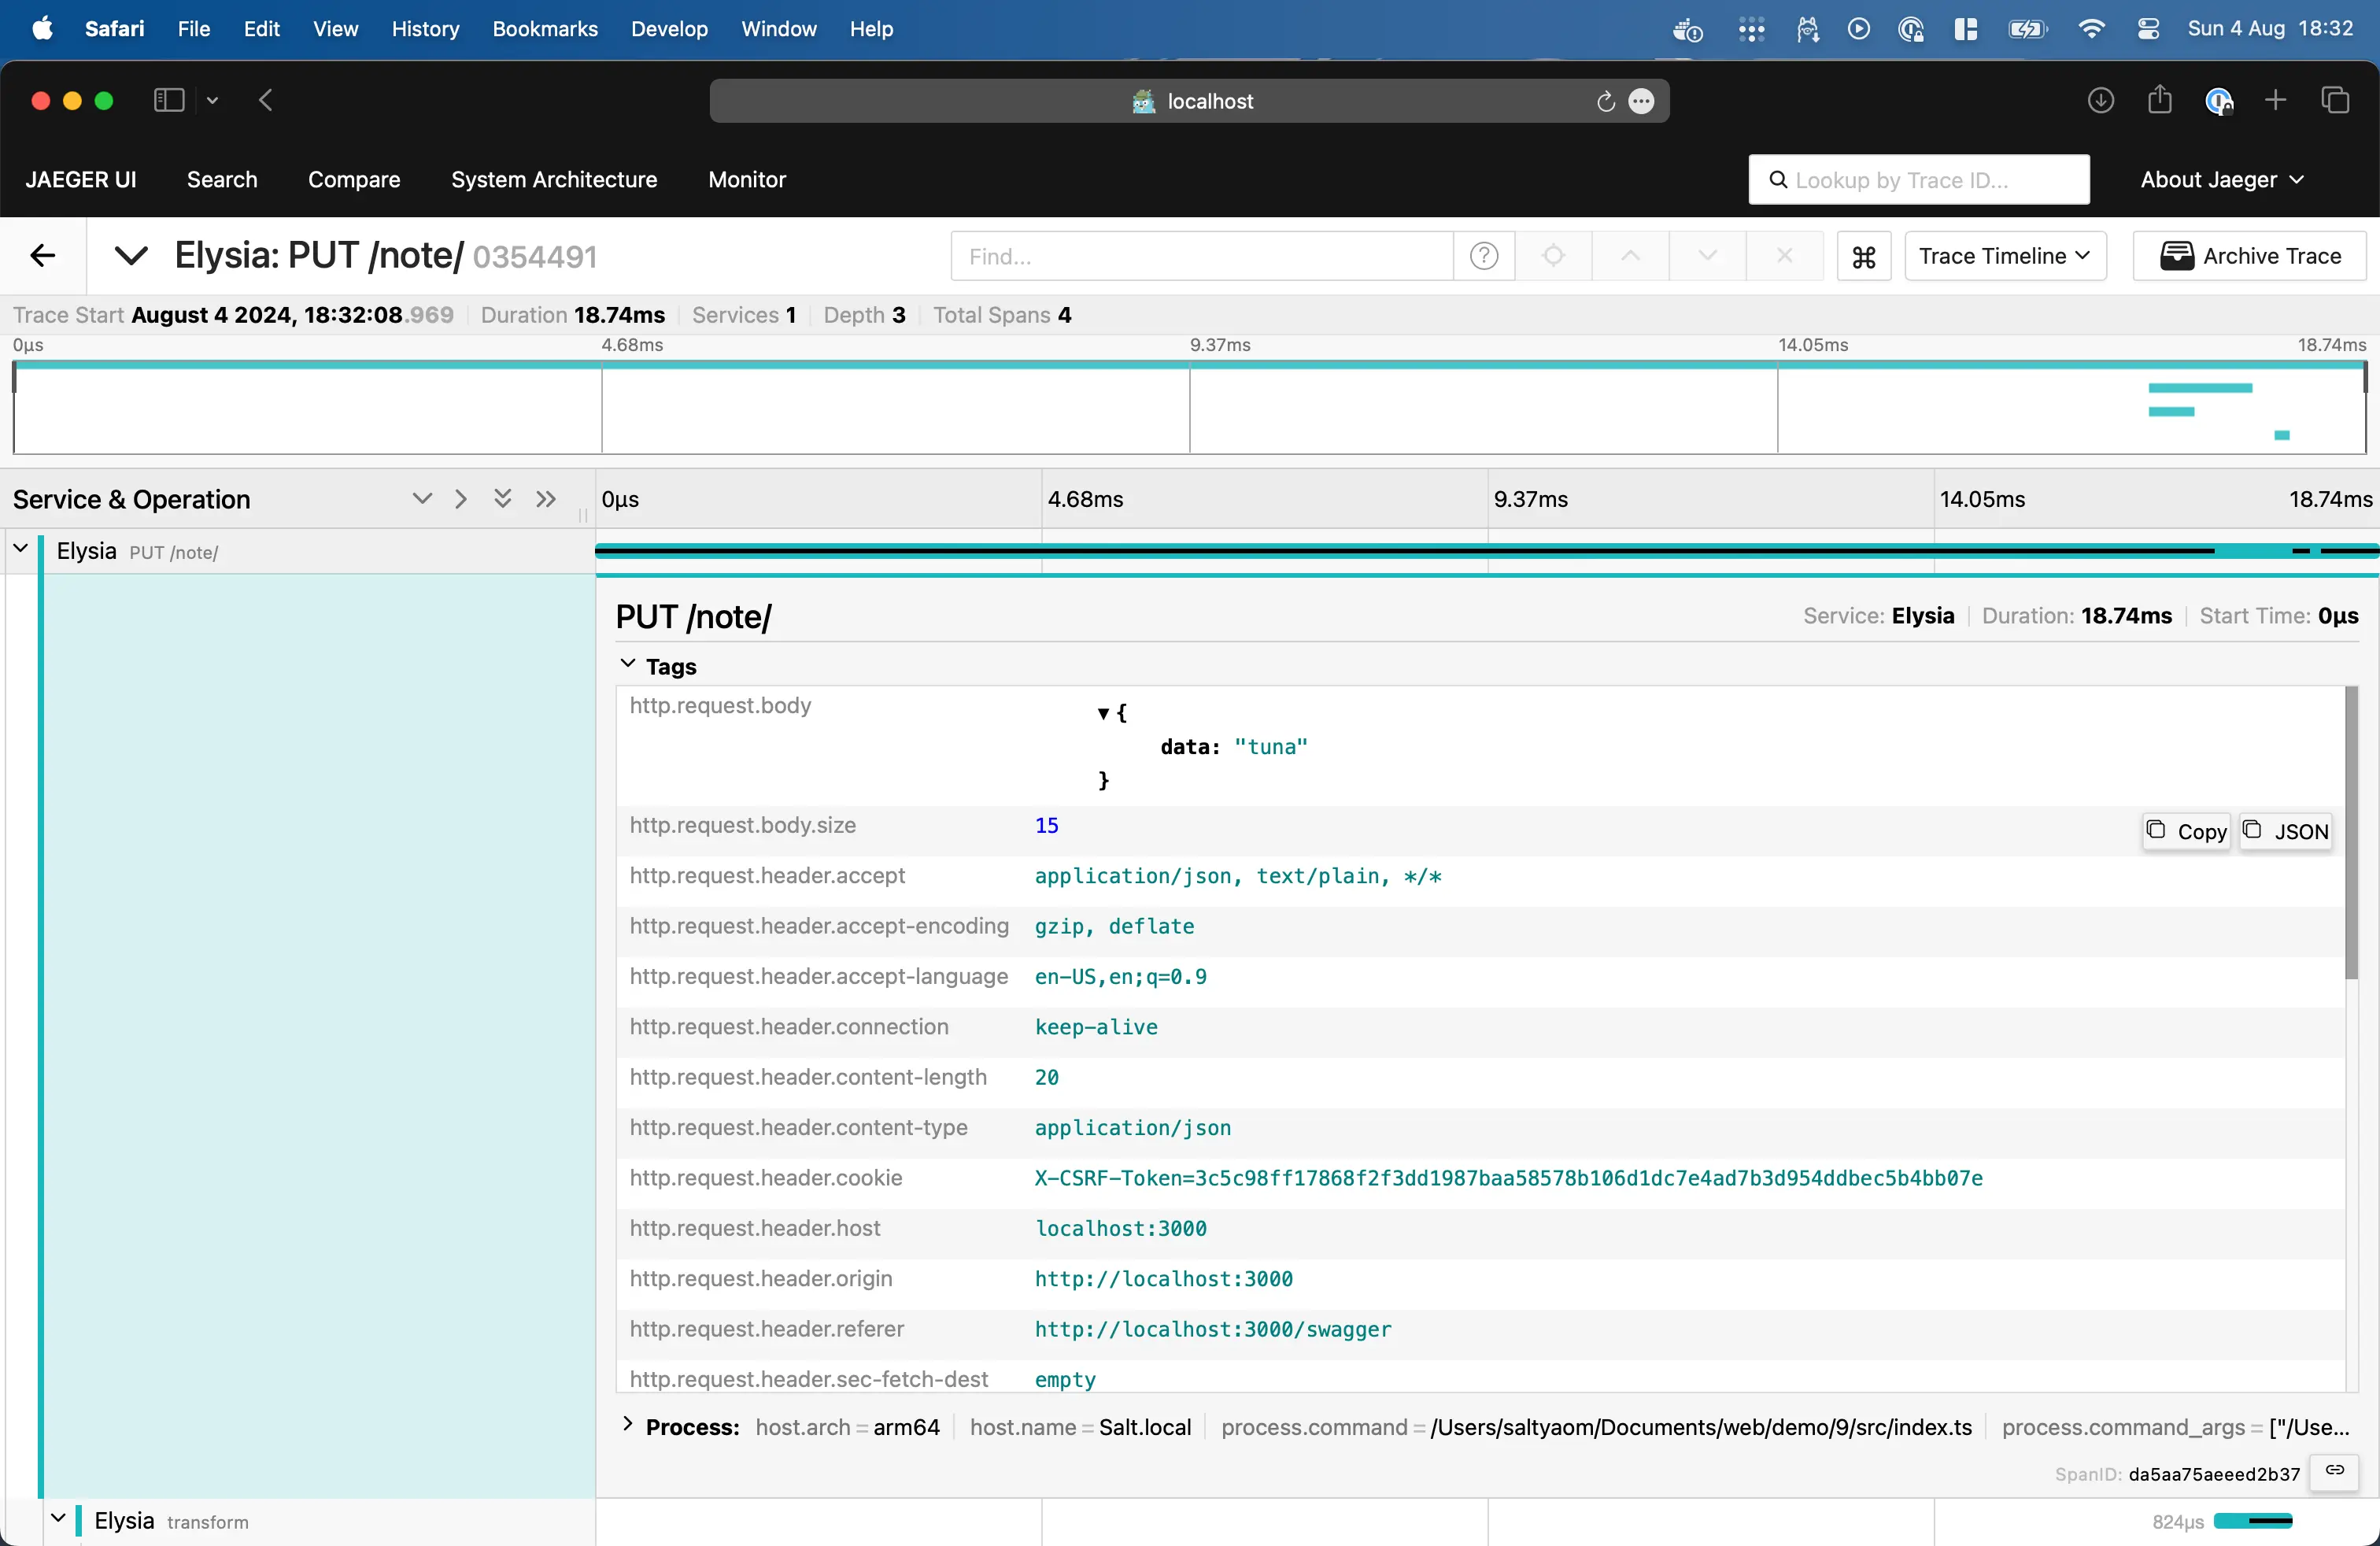
¥Click on any of the requests to see how long each lifecycle hook takes to process the request.
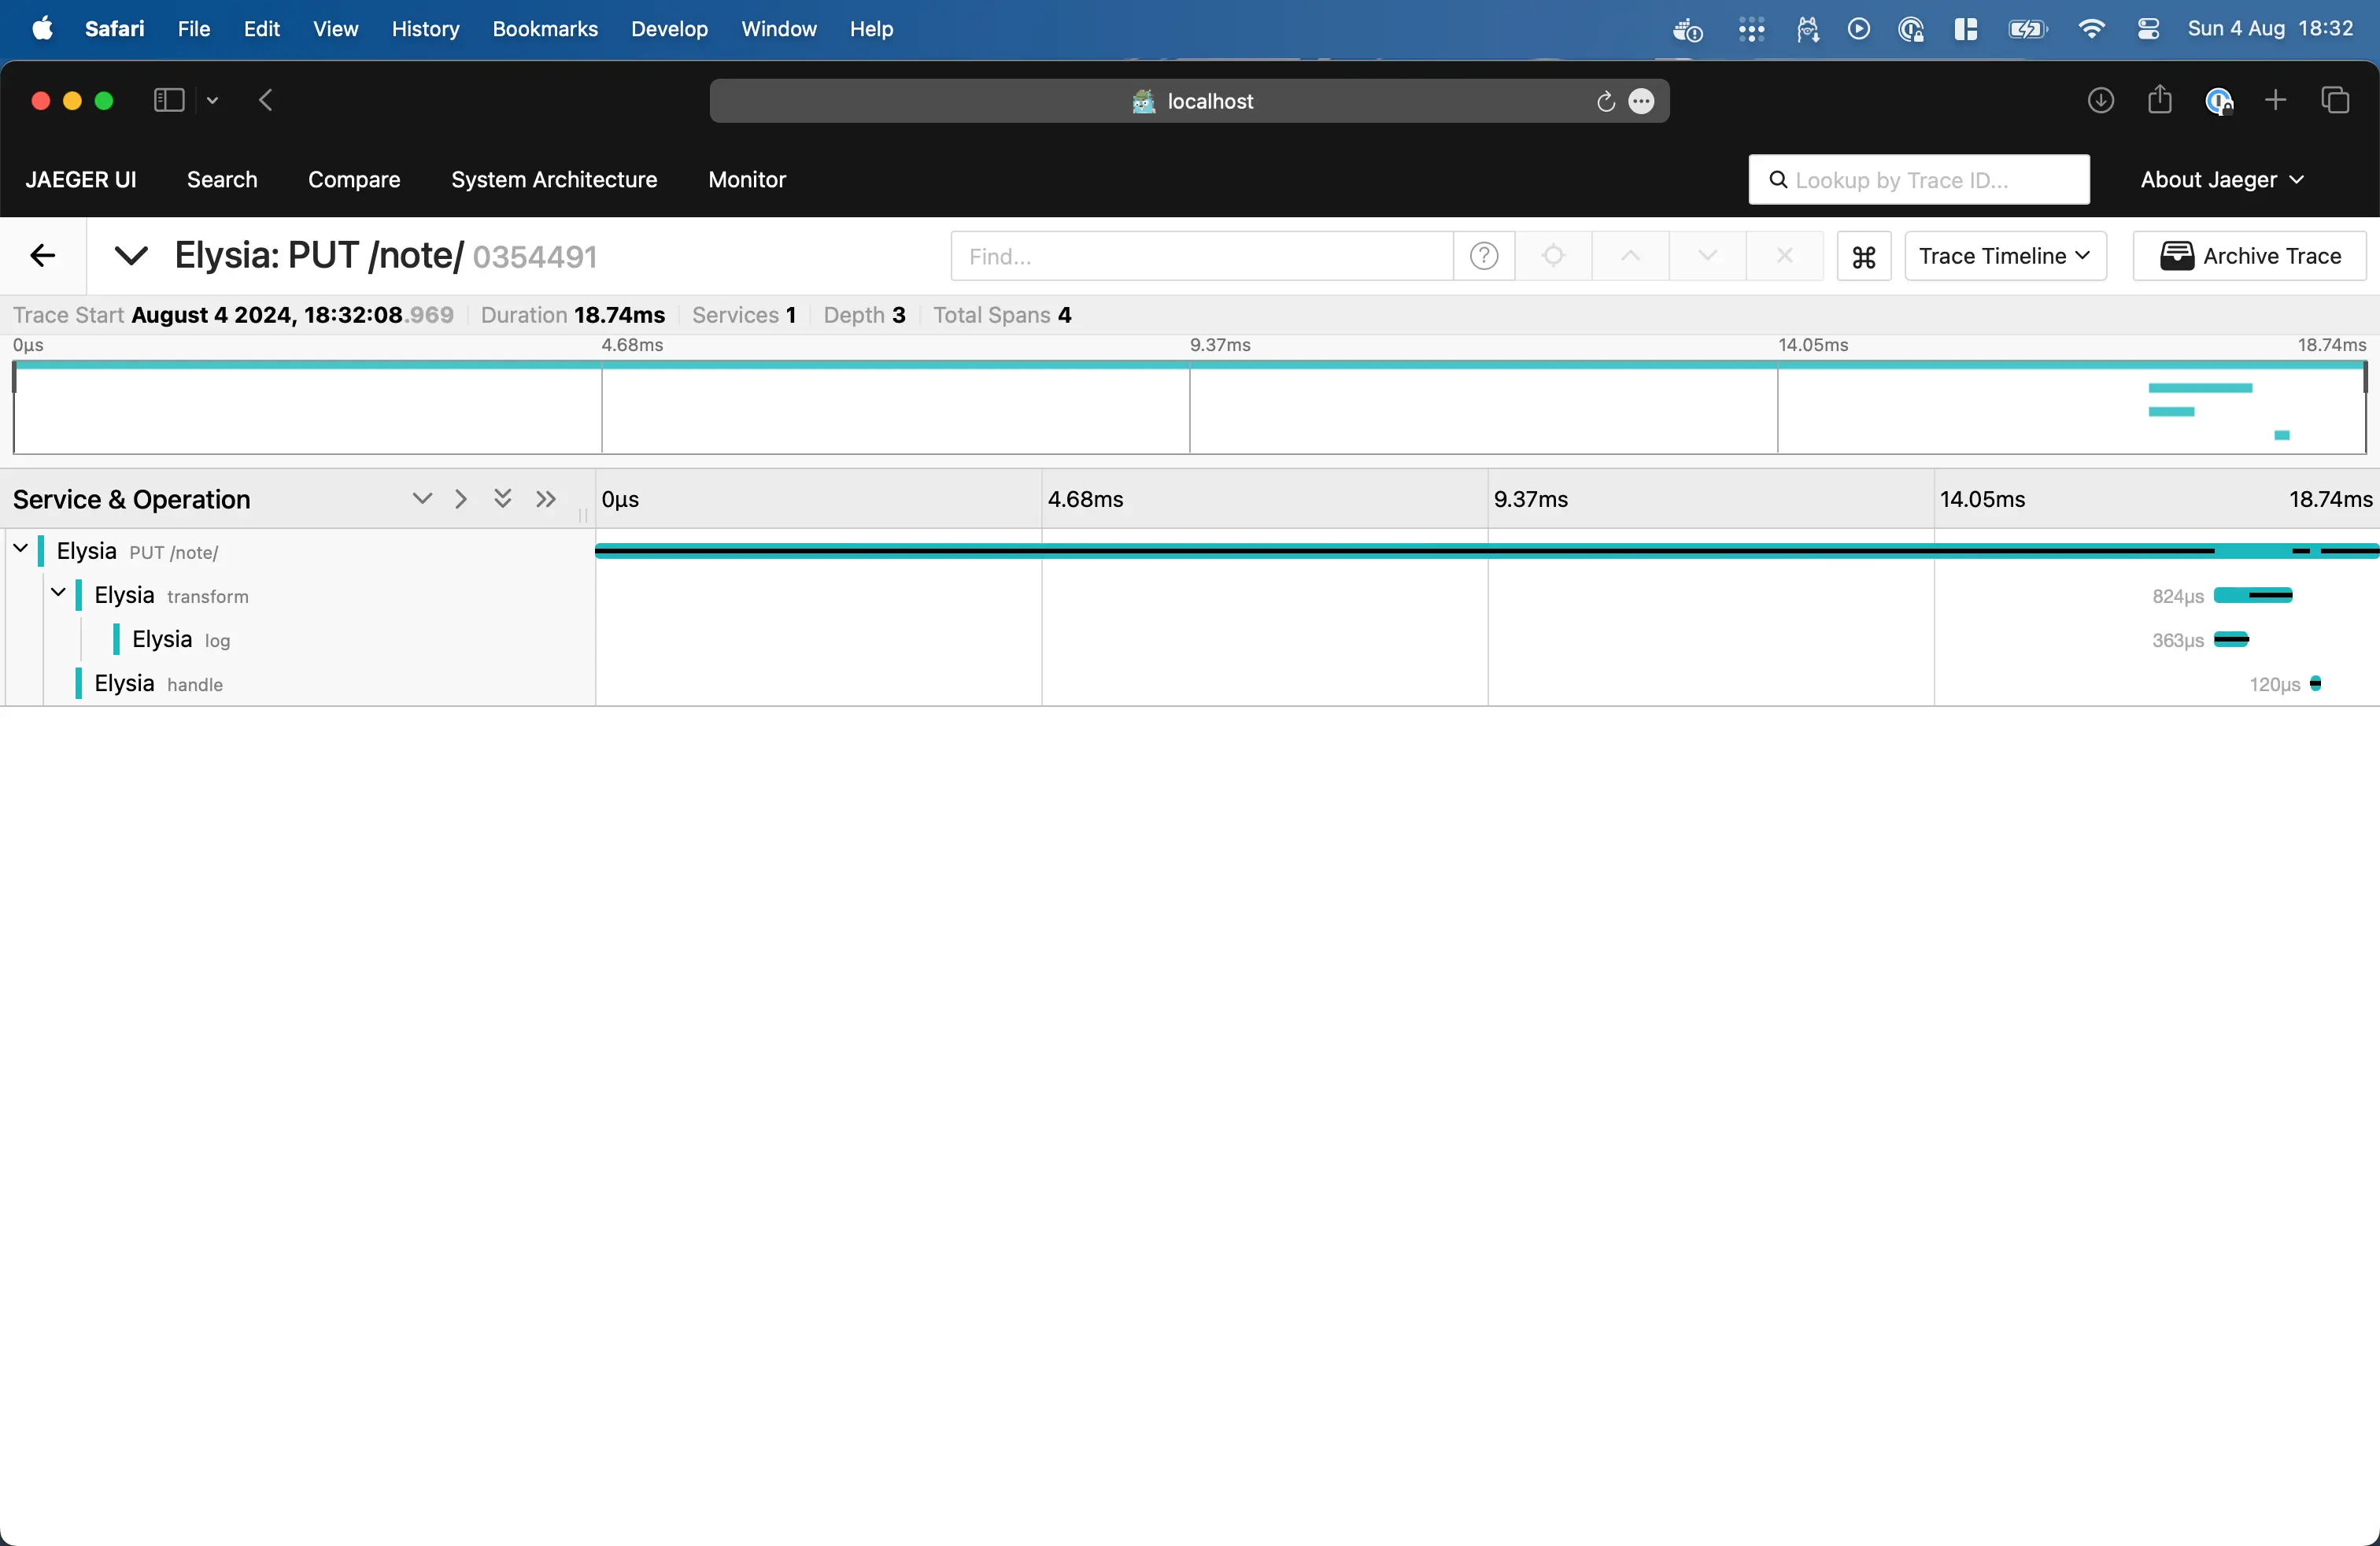
点击根父级 span 查看请求详情,这将显示请求和响应负载,以及错误(如果有)。
¥Click on the root parent span to see the request details, this will show you the request and response payload, and errors if have any.
Elysia 开箱即用地支持 OpenTelemetry,它会自动与其他支持 OpenTelemetry 的 JavaScript 库集成,例如 Prisma、GraphQL Yoga、Effect 等。
¥Elysia supports OpenTelemetry out of the box, it automatically integrates with other JavaScript libraries that support OpenTelemetry like Prisma, GraphQL Yoga, Effect, etc.
你还可以使用其他 OpenTelemetry 插件将跟踪发送到其他服务,例如 Zipkin、Prometheus 等。
¥You can also use other OpenTelemetry plugins to send traces to other services like Zipkin, Prometheus, etc.
代码库回顾
¥Codebase recap
如果你正在遵循以下步骤,你应该拥有如下所示的代码库:
¥If you are following along, you should have a codebase that looks like this:
typescript
import { Elysia } from 'elysia'
import { openapi } from '@elysiajs/openapi'
import { opentelemetry } from '@elysiajs/opentelemetry'

import { note } from './note'
import { user } from './user'

const app = new Elysia()
    .use(opentelemetry())
    .use(openapi())
    .onError(({ error, code }) => {
        if (code === 'NOT_FOUND') return 'Not Found :('

        console.error(error)
    })
    .use(user)
    .use(note)
    .listen(3000)
typescript
import { Elysia, t } from 'elysia'

export const userService = new Elysia({ name: 'user/service' })
    .state({
        user: {} as Record<string, string>,
        session: {} as Record<number, string>
    })
    .model({
        signIn: t.Object({
            username: t.String({ minLength: 1 }),
            password: t.String({ minLength: 8 })
        }),
        session: t.Cookie(
            {
                token: t.Number()
            },
            {
                secrets: 'seia'
            }
        ),
        optionalSession: t.Cookie(
            {
                token: t.Optional(t.Number())
            },
            {
                secrets: 'seia'
            }
        )
    })
    .macro({
        isSignIn(enabled: boolean) {
            if (!enabled) return

            return {
                beforeHandle({
                    status,
                    cookie: { token },
                    store: { session }
                }) {
                    if (!token.value)
                        return status(401, {
                            success: false,
                            message: 'Unauthorized'
                        })

                    const username = session[token.value as unknown as number]

                    if (!username)
                        return status(401, {
                            success: false,
                            message: 'Unauthorized'
                        })
                }
            }
        }
    })

export const getUserId = new Elysia()
    .use(userService)
    .guard({
        isSignIn: true,
        cookie: 'session'
    })
    .resolve(({ store: { session }, cookie: { token } }) => ({
        username: session[token.value]
    }))
    .as('scoped')

export const user = new Elysia({ prefix: '/user' })
    .use(userService)
    .put(
        '/sign-up',
        async ({ body: { username, password }, store, status }) => {
            if (store.user[username])
                return status(400, {
                    success: false,
                    message: 'User already exists'
                })

            store.user[username] = await Bun.password.hash(password)

            return {
                success: true,
                message: 'User created'
            }
        },
        {
            body: 'signIn'
        }
    )
    .post(
        '/sign-in',
        async ({
            store: { user, session },
            status,
            body: { username, password },
            cookie: { token }
        }) => {
            if (
                !user[username] ||
                !(await Bun.password.verify(password, user[username]))
            )
                return status(400, {
                    success: false,
                    message: 'Invalid username or password'
                })

            const key = crypto.getRandomValues(new Uint32Array(1))[0]
            session[key] = username
            token.value = key

            return {
                success: true,
                message: `Signed in as ${username}`
            }
        },
        {
            body: 'signIn',
            cookie: 'optionalSession'
        }
    )
    .get(
        '/sign-out',
        ({ cookie: { token } }) => {
            token.remove()

            return {
                success: true,
                message: 'Signed out'
            }
        },
        {
            cookie: 'optionalSession'
        }
    )
    .use(getUserId)
    .get('/profile', ({ username }) => ({
        success: true,
        username
    }))
typescript
import { Elysia, t } from 'elysia'
import { getUserId, userService } from './user'

const memo = t.Object({
    data: t.String(),
    author: t.String()
})

type Memo = typeof memo.static

class Note {
    constructor(
        public data: Memo[] = [
            {
                data: 'Moonhalo',
                author: 'saltyaom'
            }
        ]
    ) {}

    add(note: Memo) {
        this.data.push(note)

        return this.data
    }

    remove(index: number) {
        return this.data.splice(index, 1)
    }

    update(index: number, note: Partial<Memo>) {
        return (this.data[index] = { ...this.data[index], ...note })
    }
}

export const note = new Elysia({ prefix: '/note' })
    .use(userService)
    .decorate('note', new Note())
    .model({
        memo: t.Omit(memo, ['author'])
    })
    .onTransform(function log({ body, params, path, request: { method } }) {
        console.log(`${method} ${path}`, {
            body,
            params
        })
    })
    .get('/', ({ note }) => note.data)
    .use(getUserId)
    .put(
        '/',
        ({ note, body: { data }, username }) =>
            note.add({ data, author: username }),
        {
            body: 'memo'
        }
    )
    .get(
        '/:index',
        ({ note, params: { index }, status }) => {
            return note.data[index] ?? status(404, 'Not Found :(')
        },
        {
            params: t.Object({
                index: t.Number()
            })
        }
    )
    .guard({
        params: t.Object({
            index: t.Number()
        })
    })
    .delete('/:index', ({ note, params: { index }, status }) => {
        if (index in note.data) return note.remove(index)

        return status(422)
    })
    .patch(
        '/:index',
        ({ note, params: { index }, body: { data }, status, username }) => {
            if (index in note.data)
                return note.update(index, { data, author: username })

            return status(422)
        },
        {
            isSignIn: true,
            body: 'memo'
        }
    )
生产环境构建
¥Build for production
最后,我们可以使用 bun build 将服务器打包成二进制文件以供生产使用:
¥Finally we can bundle our server into a binary for production using bun build:
bash
bun build \
	--compile \
	--minify-whitespace \
	--minify-syntax \
	--target bun \
	--outfile server \
	./src/index.ts
这条命令有点长,我们来分解一下:
¥This command is a bit long, so let's break it down:
--compile- 将 TypeScript 编译为二进制文件--minify-whitespace- 删除不必要的空格--minify-syntax- 压缩 JavaScript 语法以减小文件大小--target bun- 以bun平台为目标,这可以优化目标平台的二进制文件。--outfile server- 将二进制文件输出为server./src/index.ts- 我们服务器的入口文件(代码库)
现在我们可以使用 ./server 运行二进制文件,它将像使用 bun dev 一样在 3000 端口启动服务器。
¥Now we can run the binary using ./server and it will start the server on port 3000 same as using bun dev.
bash
./server打开浏览器并访问 http://localhost:3000/openapi,你应该会看到与使用 dev 命令相同的结果。
¥Open your browser and navigate to http://localhost:3000/openapi, you should see the same result as using the dev command.
通过压缩二进制文件,我们不仅使服务器变得小巧便携,还显著降低了内存使用量。
¥By minifying the binary not only have we made our server small and portable, we also significantly reduced the memory usage of it.
提示
Bun 确实有 --minify 标志可以最小化二进制文件,但它包含 --minify-identifiers,由于我们使用了 OpenTelemetry,它会重命名函数名称,并使跟踪变得比预期更困难。
¥Bun does have the --minify flag that will minify the binary, however it includes --minify-identifiers, and as we are using OpenTelemetry, it's going to rename function names and make tracing harder than it should.
警告
练习:尝试运行开发服务器和生产服务器,并比较内存使用情况。
¥Exercise: Try to run the development server and production server, and compare the memory usage.
开发服务器将使用名为 'bun' 的进程,而生产服务器将使用名为 'server' 的进程。
¥The development server will use a process named 'bun', while the production server will use the name 'server'.
总结
¥Wrapping up
就这样 🎉
¥And- that's it 🎉
我们使用 Elysia 创建了一个简单的 API,学习了如何创建一个简单的 API、如何处理错误以及如何使用 OpenTelemetry 观察我们的服务器。
¥We have created a simple API using Elysia, we have learned how to create a simple API, how to handle errors, and how to observe our server using OpenTelemetry.
你可以更进一步,尝试连接到真实的数据库、连接到真实的前端或使用 WebSocket 实现实时通信。
¥You could to take a step further by trying to connect to a real database, connect to a real frontend or implement real-time communication with WebSocket.
本教程涵盖了创建 Elysia 服务器所需了解的大部分概念,但你可能还需要了解其他一些有用的概念。
¥This tutorial covered most of the concepts we need to know to create an Elysia server, however there are other several useful concepts you might want to know.
如果你遇到问题
¥If you are stuck
如果你有任何其他问题,欢迎在 GitHub 讨论区、Discord 和 Twitter 上向我们的社区提问。
¥If you have any further questions, feel free to ask our community on GitHub Discussions, Discord, and Twitter.
祝你使用 Elysia 一切顺利 ❤️
¥We wish you well on your journey with Elysia ❤️