
主题
OpenAPI
Elysia 提供一流的支持,并默认遵循 OpenAPI 架构。
¥Elysia has first-class support and follows OpenAPI schema by default.
Elysia 可以使用 OpenAPI 插件自动生成 API 文档页面。
¥Elysia can automatically generate an API documentation page by using an OpenAPI plugin.
要生成 Swagger 页面,请安装以下插件:
¥To generate the Swagger page, install the plugin:
bash
bun add @elysiajs/openapi将插件注册到服务器:
¥And register the plugin to the server:
typescript
import { Elysia } from 'elysia'
import { openapi } from '@elysiajs/openapi'
new Elysia()
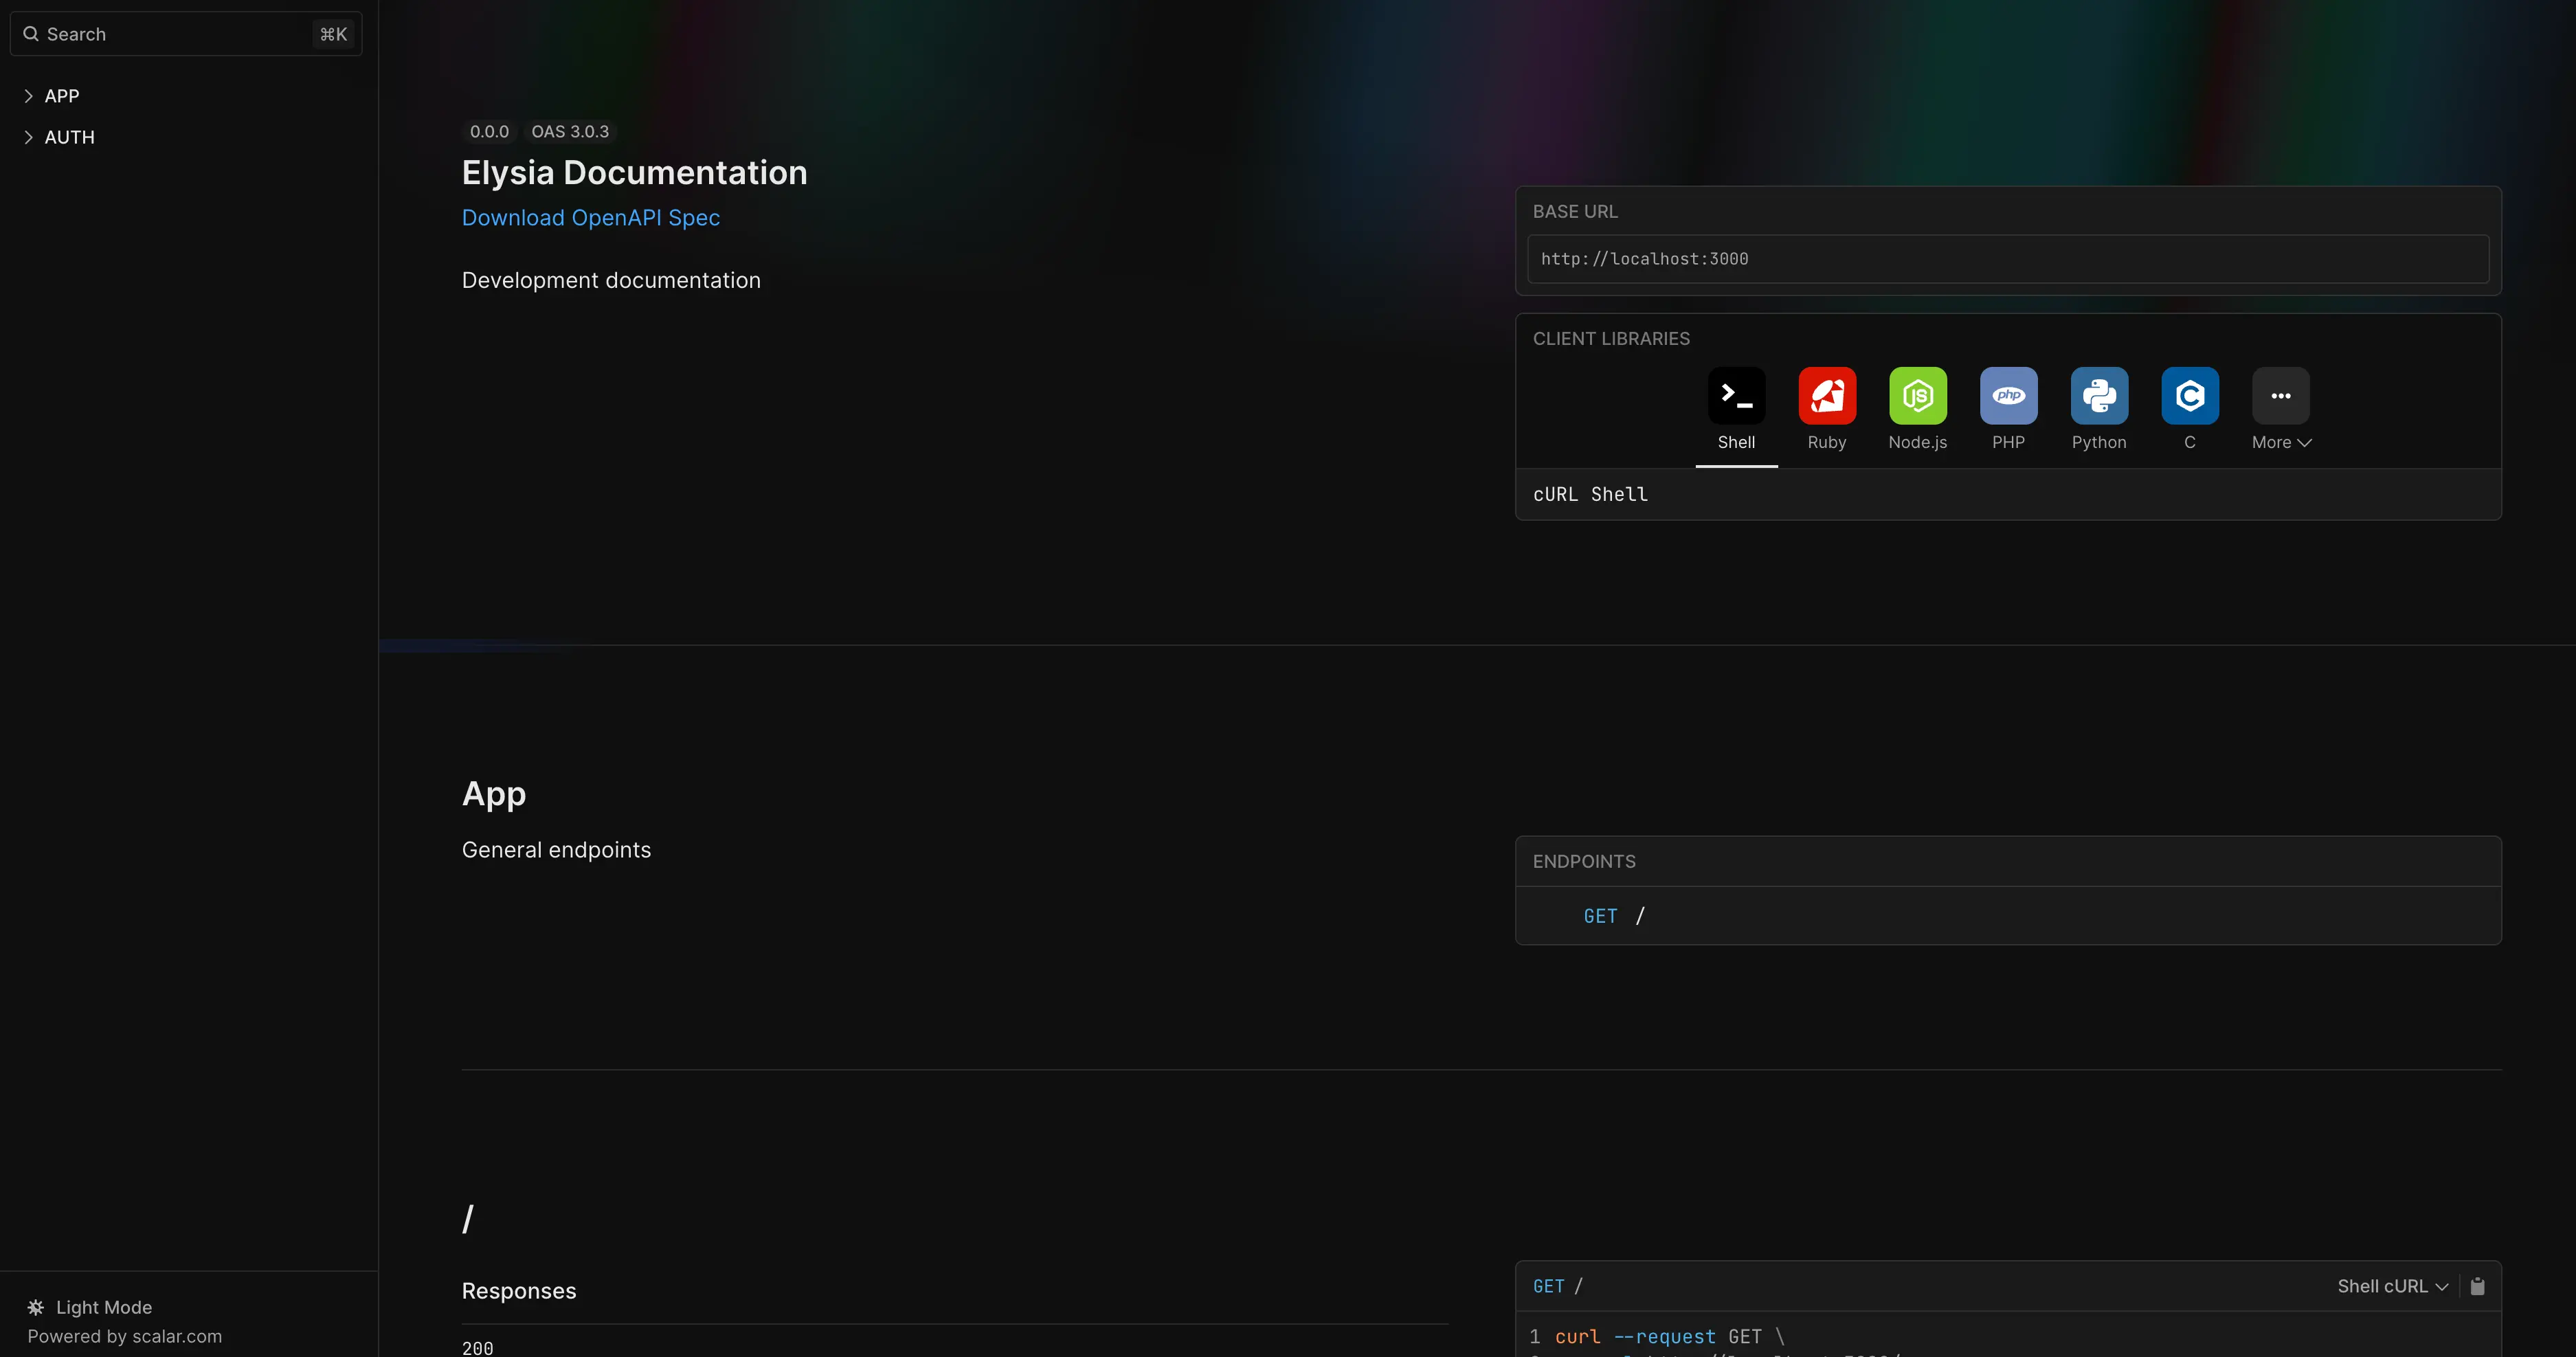
.use(openapi()) 默认情况下,Elysia 使用 OpenAPI V3 模式和 Scalar UI。
¥By default, Elysia uses OpenAPI V3 schema and Scalar UI
有关 OpenAPI 插件配置,请参阅 OpenAPI 插件页面。
¥For OpenAPI plugin configuration, see the OpenAPI plugin page.
从类型生成 OpenAPI
¥OpenAPI from types
这是可选的,但我们强烈建议你使用它,以获得更好的文档体验。
默认情况下,Elysia 依赖运行时模式来生成 OpenAPI 文档。
¥By default, Elysia relies on runtime schema to generate OpenAPI documentation.
但是,你也可以使用 OpenAPI 插件中的生成器,根据类型生成 OpenAPI 文档,如下所示:
¥However, you can also generate OpenAPI documentation from types by using a generator from OpenAPI plugin as follows:
指定项目的根文件(通常为
src/index.ts),并导出一个实例。导入一个生成器并提供从项目根目录到类型生成器的文件路径
ts
import { Elysia, t } from 'elysia'
import { openapi } from '@elysiajs/openapi'
import { fromTypes } from '@elysiajs/openapi/gen'

export const app = new Elysia()
    .use(
        openapi({
            references: fromTypes('src/index.ts')
        })
    )
    .get('/', { test: 'hello' as const })
    .post('/json', ({ body, status }) => body, {
        body: t.Object({
            hello: t.String()
        })
    })
    .listen(3000)
Elysia 将尝试通过读取导出实例的类型来生成 OpenAPI 文档。
¥Elysia will attempt to generate OpenAPI documentation by reading the type of an exported instance to generate OpenAPI documentation.
这将与运行时模式共存,并且运行时模式将优先于类型定义。
¥This will co-exists with the runtime schema, and the runtime schema will take precedence over the type definition.
生产
¥Production
在生产环境中,你可能会将 Elysia 编译为 带 Bun 的单个可执行文件 或 打包成单个 JavaScript 文件。
¥In production environment, it's likely that you might compile Elysia to a single executable with Bun or bundle into a single JavaScript file.
建议你预先生成声明文件 (.d.ts),以便为生成器提供类型声明。
¥It's recommended that you should pre-generate the declaration file (.d.ts) to provide type declaration to the generator.
ts
import { Elysia, t } from 'elysia'
import { openapi } from '@elysiajs/openapi'
import { fromTypes } from '@elysiajs/openapi/gen'

const app = new Elysia()
    .use(
        openapi({
            references: fromTypes(
            	process.env.NODE_ENV === 'production'
             		? 'dist/index.d.ts'
               		: 'src/index.ts'
            )
        })
    )
Having issues with type generation?
注意事项:根路径
¥Caveats: Root path
由于猜测项目根目录不可靠,因此建议提供项目根目录的路径,以确保生成器能够正确运行,尤其是在使用 monorepo 时。
¥As it's unreliable to guess to root of the project, it's recommended to provide the path to the project root to allow generator to run correctly, especially when using monorepo.
ts
import { Elysia, t } from 'elysia'
import { openapi } from '@elysiajs/openapi'
import { fromTypes } from '@elysiajs/openapi/gen'

export const app = new Elysia()
    .use(
        openapi({
            references: fromTypes('src/index.ts', {
            	projectRoot: path.join('..', import.meta.dir)
            })
        })
    )
    .get('/', { test: 'hello' as const })
    .post('/json', ({ body, status }) => body, {
        body: t.Object({
            hello: t.String()
        })
    })
    .listen(3000)
自定义 tsconfig.json
¥Custom tsconfig.json
如果你有多个 tsconfig.json 文件,请务必指定一个正确的 tsconfig.json 文件用于类型生成。
¥If you have multiple tsconfig.json files, it's important that you must specify a correct tsconfig.json file to be used for type generation.
ts
import { Elysia, t } from 'elysia'
import { openapi } from '@elysiajs/openapi'
import { fromTypes } from '@elysiajs/openapi/gen'

export const app = new Elysia()
    .use(
        openapi({
            references: fromTypes('src/index.ts', {
            	// This is reference from root of the project
            	tsconfigPath: 'tsconfig.dts.json'
            })
        })
    )
    .get('/', { test: 'hello' as const })
    .post('/json', ({ body, status }) => body, {
        body: t.Object({
            hello: t.String()
        })
    })
    .listen(3000)
OpenAPI 的标准 Schema
¥Standard Schema with OpenAPI
Elysia 将尝试使用每个架构中的原生方法转换为 OpenAPI 架构。
¥Elysia will try to use a native method from each schema to convert to OpenAPI schema.
但是,如果架构未提供原生方法,你可以通过提供 mapJsonSchema 来向 OpenAPI 提供自定义架构,如下所示:
¥However, if the schema doesn't provide a native method, you can provide a custom schema to OpenAPI by providing a mapJsonSchema as follows:
Zod OpenAPI
由于 Zod 的架构没有 toJSONSchema 方法,我们需要提供一个自定义映射器将 Zod 架构转换为 OpenAPI 架构。
¥As Zod doesn't have a toJSONSchema method on the schema, we need to provide a custom mapper to convert Zod schema to OpenAPI schema.
typescript
import openapi from '@elysiajs/openapi'
import * as z from 'zod'

openapi({
	mapJsonSchema: {
		zod: z.toJSONSchema
	}
})
typescript
import openapi from '@elysiajs/openapi'
import { zodToJsonSchema } from 'zod-to-json-schema'

openapi({
	mapJsonSchema: {
		zod: zodToJsonSchema
	}
})
描述路线
¥Describing route
我们可以通过提供模式类型来添加路由信息。
¥We can add route information by providing a schema type.
然而,有时仅定义类型并不能清楚地说明路由可能做什么。你可以使用 detail 字段明确描述路由。
¥However, sometimes defining only a type does not make it clear what the route might do. You can use detail fields to explicitly describe the route.
typescript
import { Elysia, t } from 'elysia'
import { openapi } from '@elysiajs/openapi'

new Elysia()
	.use(openapi())
	.post(
		'/sign-in',
		({ body }) => body, {
    		body: t.Object(
      		{
	            username: t.String(),
	            password: t.String({
	                minLength: 8,
	                description: 'User password (at least 8 characters)'
	            })
	        },
	        {
	            description: 'Expected a username and password'
	        }
	    ),
	    detail: {
	        summary: 'Sign in the user',
	        tags: ['authentication']
	    }
	})
detail 字段遵循 OpenAPI V3 定义,默认具有自动补全和类型安全功能。
¥The detail fields follows an OpenAPI V3 definition with auto-completion and type-safety by default.
然后将详细信息传递给 OpenAPI,并将描述放入 OpenAPI 路由。
¥Detail is then passed to OpenAPI to put the description to OpenAPI route.
响应头
¥Response headers
我们可以通过使用 withHeader 封装模式来添加响应头:
¥We can add a response headers by wrapping a schema with withHeader:
typescript
import { Elysia, t } from 'elysia'
import { openapi, withHeader } from '@elysiajs/openapi'

new Elysia()
	.use(openapi())
	.get(
		'/thing',
		({ body, set }) => {
			set.headers['x-powered-by'] = 'Elysia'

			return body
		},
		{
		    response: withHeader(
				t.Literal('Hi'),
				{
					'x-powered-by': t.Literal('Elysia')
				}
			)
		}
)请注意,withHeader 只是一个注解,并不强制或验证实际的响应头。你需要手动设置 headers。
¥Note that withHeader is an annotation only, and does not enforce or validate the actual response headers. You need to set the headers manually.
隐藏路线
¥Hide route
你可以通过将 detail.hide 设置为 true 来隐藏 Swagger 页面中的路由。
¥You can hide the route from the Swagger page by setting detail.hide to true
typescript
import { Elysia, t } from 'elysia'
import { openapi } from '@elysiajs/openapi'

new Elysia()
	.use(openapi())
	.post(
		'/sign-in',
		({ body }) => body,
		{
		    body: t.Object(
		        {
		            username: t.String(),
		            password: t.String()
		        },
		        {
		            description: 'Expected a username and password'
		        }
		    ),
		    detail: {
		        hide: true
		    }
		}
	)
标签
¥Tags
Elysia 可以使用 Swaggers 标签系统将端点分组。
¥Elysia can separate the endpoints into groups by using the Swaggers tag system
首先,在 Swagger 配置对象中定义可用的标签
¥Firstly define the available tags in the swagger config object
typescript
new Elysia().use(
    openapi({
        documentation: {
            tags: [
                { name: 'App', description: 'General endpoints' },
                { name: 'Auth', description: 'Authentication endpoints' }
            ]
        }
    })
)
然后使用端点配置部分的 details 属性将该端点分配给组
¥Then use the details property of the endpoint configuration section to assign that endpoint to the group
typescript
new Elysia()
    .get('/', () => 'Hello Elysia', {
        detail: {
            tags: ['App']
        }
    })
    .group('/auth', (app) =>
        app.post(
            '/sign-up',
            ({ body }) =>
                db.user.create({
                    data: body,
                    select: {
                        id: true,
                        username: true
                    }
                }),
            {
                detail: {
                    tags: ['Auth']
                }
            }
        )
    )
将生成如下所示的 Swagger 页面
¥Which will produce a swagger page like the following
标签组
¥Tags group
Elysia 可以接受标签,将整个实例或一组路由添加到特定标签。
¥Elysia may accept tags to add an entire instance or group of routes to a specific tag.
typescript
import { Elysia, t } from 'elysia'

new Elysia({
    tags: ['user']
})
    .get('/user', 'user')
    .get('/admin', 'admin')
模型
¥Models
通过使用 参考模型,Elysia 将自动处理模式生成。
¥By using reference model, Elysia will handle the schema generation automatically.
通过将模型分离为专用部分并通过引用链接。
¥By separating models into a dedicated section and linked by reference.
typescript
new Elysia()
    .model({
        User: t.Object({
            id: t.Number(),
            username: t.String()
        })
    })
    .get('/user', () => ({ id: 1, username: 'saltyaom' }), {
        response: {
            200: 'User'
        },
        detail: {
            tags: ['User']
        }
    })
守护
¥Guard
或者,Elysia 可以接受守卫,将整个实例或一组路由添加到特定的守卫。
¥Alternatively, Elysia may accept guards to add an entire instance or group of routes to a specific guard.
typescript
import { Elysia, t } from 'elysia'

new Elysia()
    .guard({
        detail: {
            description: 'Require user to be logged in'
        }
    })
    .get('/user', 'user')
    .get('/admin', 'admin')
变更 OpenAPI 端点
¥Change OpenAPI Endpoint
你可以通过在插件配置中设置 path 来更改 OpenAPI 端点。
¥You can change the OpenAPI endpoint by setting path in the plugin config.
typescript
import { Elysia } from 'elysia'
import { openapi } from '@elysiajs/openapi'

new Elysia()
    .use(
        openapi({
            path: '/v2/openapi'
        })
    )
    .listen(3000)
自定义 OpenAPI 信息
¥Customize OpenAPI info
我们可以通过在插件配置中设置 documentation.info 来自定义 OpenAPI 信息。
¥We can customize the OpenAPI information by setting documentation.info in the plugin config.
typescript
import { Elysia } from 'elysia'
import { openapi } from '@elysiajs/openapi'

new Elysia()
    .use(
        openapi({
            documentation: {
                info: {
                    title: 'Elysia Documentation',
                    version: '1.0.0'
                }
            }
        })
    )
    .listen(3000)
这在以下情况下很有用:
¥This can be useful for
添加标题
设置 API 版本
添加了解释 API 用途的描述
解释可用的标签以及每个标签的含义
安全配置
¥Security Configuration
要保护你的 API 端点,你可以在 Swagger 配置中定义安全方案。以下示例演示了如何使用 Bearer Authentication (JWT) 保护你的端点:
¥To secure your API endpoints, you can define security schemes in the Swagger configuration. The example below demonstrates how to use Bearer Authentication (JWT) to protect your endpoints:
typescript
new Elysia().use(
    openapi({
        documentation: {
            components: {
                securitySchemes: {
                    bearerAuth: {
                        type: 'http',
                        scheme: 'bearer',
                        bearerFormat: 'JWT'
                    }
                }
            }
        }
    })
)

export const addressController = new Elysia({
    prefix: '/address',
    detail: {
        tags: ['Address'],
        security: [
            {
                bearerAuth: []
            }
        ]
    }
})
这将确保 /address 前缀下的所有端点都需要有效的 JWT 令牌才能访问。
¥This will ensures that all endpoints under the /address prefix require a valid JWT token for access.